
For a brilliant clean, a shower guide means understanding its parts, regular cleaning, and simple maintenance. This guide breaks down your shower’s essential tips, from ensuring proper water flow to keeping it sparkling, making upkeep easy and effective for a fresh bathroom experience.
Welcome to your ultimate shower guide! Is your shower feeling a bit less than brilliant lately? Maybe the water pressure isn’t what it used to be, or those little bits of grime are starting to make a home in the corners. Don’t worry, getting your shower back to its sparkling best is totally achievable. We’ve all been there, staring at a less-than-ideal shower and wondering where to start. This guide is here to help. We’ll walk you through everything you need to know, from the basics of how your shower works to simple, effective cleaning tricks. Get ready to transform your daily shower into a refreshing escape!
Think of your shower as a mini system working hard every day. It’s designed to give you that invigorating start or relaxing end to your day. But like any hardworking system, it needs a little attention to keep it running smoothly and looking its best. We’ll cover everything from the showerhead itself to the drain, ensuring every part contributes to a truly brilliant clean. You’ll gain the confidence to tackle common issues and maintain a shower you’ll love.
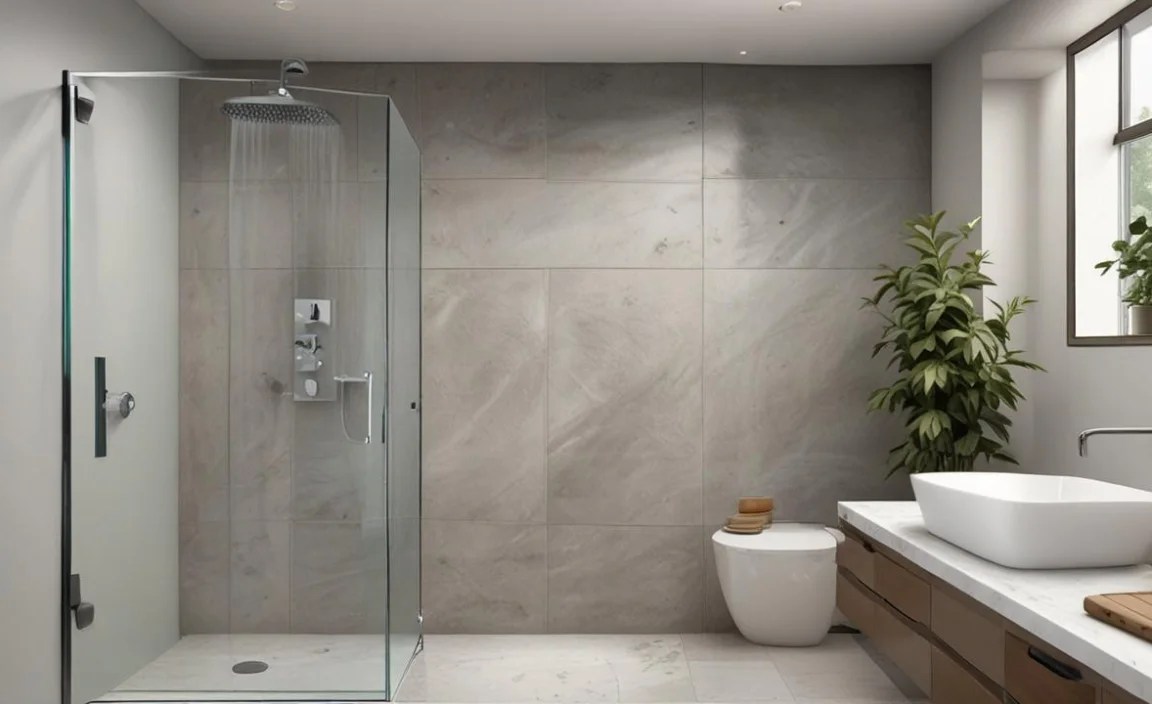
First, let’s get familiar with the key components of your shower. Knowing these parts will help you understand how to care for them. It’s not as complicated as it sounds, and once you know what’s what, maintenance becomes much easier.
Understanding Your Shower’s Anatomy

Your shower is a surprisingly simple, yet effective, system. When you turn the handle, you’re activating a series of events that bring water from your home’s main supply to your showerhead, ready to refresh you. Let’s break down the main players:
The Shower Valve (or Faucet)

This is the control center of your shower. It’s where you adjust the water temperature and flow. Inside, a cartridge or stem mixes hot and cold water to your desired setting and controls whether the water comes out of the faucet or the showerhead (if you have a tub/shower combo).
The Shower Arm

This is the pipe that extends from the wall and holds the showerhead. It’s typically made of metal and can sometimes be adjusted to change the height or angle of your showerhead.
The Showerhead

This is the star of the show! It’s the fixture that sprays the water. Modern showerheads come in many styles, from fixed wall-mounted ones to handheld options. The small holes, called nozzles, are designed to create a spray pattern. Mineral buildup can clog these, affecting your shower experience.
The Drain

Located at the lowest point of your shower floor, the drain’s job is to whisk away water. It’s crucial for preventing standing water and protecting your bathroom from moisture damage. It usually has a cover or grate to catch hair and debris.
The Shower Enclosure (Optional)

This can be a shower curtain, glass doors, or a tiled alcove. Its purpose is to keep water contained within the shower area, protecting your bathroom floor from getting soaked.
Essential Tools for a Brilliant Shower Clean

Before we dive into cleaning, let’s gather your toolkit. You don’t need a professional arsenal; most of these are common household items. Having the right tools makes the job quicker and more effective.
Your Shower Cleaning Arsenal:

- Microfiber Cloths: Great for wiping surfaces without scratching and for polishing.
- An Old Toothbrush: Perfect for scrubbing grout lines and tight corners.
- Spray Bottles: Handy for applying your cleaning solutions.
- Rubber Gloves: Protect your hands from cleaning agents.
- Squeegee: Excellent for wiping down glass doors or tile walls to prevent water spots.
- Bucket: Useful for mixing larger batches of cleaning solutions or for rinsing tools.
- Soft Bristle Brush: For scrubbing larger surfaces like the shower floor or tub.
- Plunger: Essential for tackling minor drain clogs.
DIY Cleaning Solutions for a Sparkling Shower

Why buy harsh chemicals when you can make effective cleaners from simple ingredients? These DIY solutions are eco-friendly, budget-friendly, and surprisingly powerful against soap scum, mildew, and water spots.
Vinegar Power: The All-Around Cleaner

White vinegar is a powerhouse for cutting through mineral deposits (like limescale) and soap scum. Its acidity breaks down the buildup, making it easy to wipe away.
- For General Cleaning: Mix equal parts white vinegar and water in a spray bottle.
- For Tough Buildup: Use undiluted white vinegar.
Baking Soda: The Gentle Scrubber

Baking soda is a mild abrasive that can help lift grime and deodorize. It’s perfect for scrubbing without scratching delicate surfaces.
- As a Paste: Mix baking soda with a little water to create a paste.
- With Vinegar: Combine baking soda and vinegar for a fizzy cleaning reaction that can help dislodge stubborn dirt.
Lemon Juice: For Shine and Freshness

Lemon juice can help with some mineral deposits and leaves a pleasant, fresh scent. It also has mild bleaching properties that can help with light mildew spots.
Dish Soap: The Grease Cutter

A few drops of dish soap can help break down oily residues and soap scum, making your shower gleam.
Step-by-Step Guide: Achieving a Brilliant Shower Clean

Now that you have your tools and cleaners ready, let’s get your shower sparkling. Follow these steps for a thorough and effective clean.
Step 1: Preparation is Key

Start by removing everything from the shower – shampoo bottles, soap, loofahs. This gives you clear access to all surfaces. If you have a shower curtain, consider taking it down to wash it. Open a window or turn on the exhaust fan for ventilation, especially if you’re using vinegar.
Step 2: Tackle the Showerhead

Mineral buildup can clog your showerhead’s nozzles, reducing water pressure and causing uneven spray. The easiest way to deal with this is to soak it.
- For Removable Showerheads: Unscrew the showerhead from the shower arm. Place it in a bowl or bucket filled with undiluted white vinegar. Make sure the showerhead is fully submerged. Let it soak for at least 4-8 hours, or overnight for stubborn clogs.
- For Non-Removable Showerheads: Fill a plastic bag (like a sturdy zip-top bag) with white vinegar. Place the bag over the showerhead, ensuring the nozzles are submerged in the vinegar. Secure the bag tightly around the shower arm with a rubber band or twist tie. Let it soak for at least 4-8 hours.
After soaking, remove the showerhead (or bag) and use an old toothbrush to gently scrub away any remaining residue from the nozzles. Rinse the showerhead thoroughly under running water and reattach it if you removed it.
For more information on maintaining showerheads, you can consult resources from the Toolstation blog, which offers practical advice.
Step 3: Clean the Shower Walls and Doors

This is where soap scum and mildew often gather. Spray your chosen cleaning solution (vinegar and water or a baking soda paste) onto the walls and doors. Let it sit for 5-10 minutes to allow it to work.
- For Tile Walls: Use a soft bristle brush or a microfiber cloth to scrub the tiles and grout lines. For grout, the toothbrush is your best friend!
- For Glass Doors: Scrub with a microfiber cloth or sponge. Pay attention to the bottom track where water and soap can accumulate.
- For Acrylic/Fiberglass: Be gentle. Avoid abrasive scrubbers that could scratch the surface.
Rinse thoroughly with water and then use a squeegee to wipe down the glass or tile, starting from the top and working your way down. This prevents water spots and streaks.
Step 4: Scrub the Shower Floor or Tub

This area usually deals with the most dirt and grime. Apply your cleaning solution and let it sit for a few minutes.
- Use your soft brush or a larger scrub brush to scrub the entire floor or tub surface.
- For stubborn stains, you can create a paste of baking soda and water, apply it to the stain, let it sit for 15-20 minutes, and then scrub.
- Rinse thoroughly with water.
Step 5: Address the Drain

A slow-draining shower is a common and frustrating problem. First, remove any visible hair or debris from the drain cover.
1. For Minor Clogs: Pour a generous amount of baking soda down the drain, followed by a cup of white vinegar. Let it fizz for about 30 minutes, then flush with hot water.
2. For Stubborn Clogs: If the baking soda and vinegar trick doesn’t work, you might need a drain snake or plunger. For persistent issues, consider calling a plumber.
You can find more detailed drain cleaning tips from the U.S. Environmental Protection Agency (EPA), focusing on safe and effective methods.
Step 6: Don’t Forget the Fixtures and Accessories

Wipe down the faucet handles, shower arm, and any shelves or soap dishes with your all-purpose cleaner and a microfiber cloth. Buff them dry to a shine.
Step 7: The Shower Curtain or Doors

- Shower Curtains: Most fabric shower curtains can be machine washed with detergent and a few towels on a gentle cycle. Add 1/2 cup of baking soda to the wash with your curtain for extra brightening, or 1/2 cup of vinegar during the rinse cycle to kill mildew. Hang to dry. Vinyl or plastic curtains can be wiped down with your vinegar solution and rinsed.
- Glass Doors: Use your squeegee method to ensure they are streak-free. For extra shine, a final polish with a dry microfiber cloth works wonders.
Table of Cleaning Solution Strengths and Uses

Here’s a quick reference to help you choose the right cleaning solution for different shower issues:
| Cleaning Solution | Primary Uses | Strength Level | Best For |
|---|---|---|---|
| White Vinegar & Water (1:1) | General soap scum, mild mineral deposits, everyday cleaning. | Medium | Walls, doors, general surfaces, weekly maintenance. |
| Undiluted White Vinegar | Heavy mineral deposits (limescale), soap scum buildup. | High | Soaking showerheads, tough spots on tile, stubborn buildup. |
| Baking Soda Paste | Stubborn stains, grimy grout, deodorizing. | Medium | Grout lines, stained shower floors, tougher spots you can scrub directly. |
| Baking Soda & Vinegar Fizz | Loosening grime, deodorizing drains. | Medium | Drains, heavily soiled areas needing a bit of scrubbing power. |
| Dish Soap | Greasy residue, light soap scum. | Low to Medium | Daily wipe-downs, finishing touches, cutting through oily residues. |
Preventative Maintenance for a Consistently Brilliant Shower

Keeping your shower sparkling doesn’t have to be a daunting task. A little bit of daily or weekly maintenance can go a long way in preventing tough buildup and keeping everything fresh. Think of it as giving your shower a little love regularly!
Daily Habits for a Cleaner Shower:

- Squeegee After Use: A quick wipe down of glass doors or tiled walls with a squeegee after showering can remove most of the water and soap residue before it dries and hardens. This is one of the most effective ways to prevent soap scum and water spots.
- Ventilation is Key: Always use your bathroom fan or open a window during and after your shower. This reduces humidity, which helps prevent mold and mildew growth.
- Wipe Down Surfaces: Take a moment to quickly wipe down any areas where water tends to collect, like the edges of the shower base or around faucets.
Weekly Checks and Quick Cleans:

- Rinse Away Residue: Give your shower walls and floor a quick rinse with water at the end of the week to wash away any lingering soap or shampoo residue.
- Check the Drain: Make sure there’s no visible hair or soap buildup around the drain. A quick clean here can prevent future clogs.
- Spot Clean: Address any small spots of mildew or hard water stains as soon as you see them. A quick spray of vinegar and a wipe can save you a lot of scrubbing later.
Troubleshooting Common Shower Issues

Even with the best care, occasional problems can arise. Here are some common issues and how to handle them:
Issue: Low Water Pressure

Cause: Typically due to mineral buildup in the showerhead or, less commonly, a partially closed water valve or a clog in the pipes.
Solution: First, clean the showerhead as described above. If that doesn’t help, check if your home’s main water valve is fully open. If pressure is low everywhere in the house, you may need to contact a plumber to inspect your pipes.
Issue: Mildew or Mold

Cause: Excess moisture and poor ventilation. It thrives in warm, damp environments.
Solution: Ensure proper ventilation. Clean affected areas with a vinegar solution or a mild bleach solution (use bleach cautiously and ensure good ventilation, never mix with vinegar). For persistent mold, professional remediation might be necessary.
Issue: Stubborn Soap Scum
Cause: A combination of soap residue, body oils, and hard water minerals that solidify over time.
Solution: Regular cleaning with vinegar or a baking soda paste is key. For very tough scum, you might need to let the cleaner sit longer or scrub more vigorously with a firm brush.
Issue: Leaky Faucet or Shower Valve

Cause: Worn-out O-rings, washers, or a faulty cartridge inside the valve.
Solution: This often requires replacing internal parts. While some DIYers can tackle this, it can be intricate. If you’re not comfortable, it’s best to call a qualified plumber to assess and repair the leak, preventing water waste and potential damage.
Issue: Unpleasant Odors from the Drain
Cause: Hair, soap scum, and other organic matter decomposing in the drain trap.
Solution: Regular drain cleaning with baking soda and vinegar, or using enzyme-based drain cleaners, can help. Avoid harsh chemical drain cleaners if possible, as they can damage pipes over time.
FAQ: Your Shower Questions Answered
Q1: How often should I clean my shower?
A1: For a brilliant shine and to prevent buildup, aim for a quick tidy-up (squeegee, rinse) weekly, and a more thorough scrub (walls, floor, fixtures) every 2-4 weeks, depending on usage and water hardness.
Q2: Is vinegar safe to use on all shower surfaces?
A2: White vinegar is generally safe for most bathroom surfaces like tile, glass, and porcelain. However, avoid using it on natural stone (like marble or granite) as its acidity can etch the surface. Always test in an inconspicuous area first if you’re unsure.
Q3: My showerhead has very little pressure. What’s the first thing I should do?
A3: The most common reason for low pressure is mineral buildup clogging the showerhead nozzles. Try soaking the showerhead in white vinegar overnight, as detailed in the guide. If that doesn’t help, the issue might be further back in your plumbing.
Q4: How can I prevent mold and mildew in my shower?
A4: Proper ventilation is crucial! Always use your bathroom fan or open a window during and after showering. Regularly clean and dry surfaces, and address any small leaks promptly. Hanging shower curtains to dry completely can also help.
Q5: What’s the best way to clean grout lines?
A5: An old toothbrush is your best friend for grout! Apply a baking soda paste or a vinegar-based cleaner directly to the grout lines, let it sit for a few minutes, then scrub with the toothbrush. Rinse thoroughly.
Q6: Do I need special cleaners for hard water stains?
A6:
