
Understanding the layout of a faucet is crucial for easy installation and maintenance. This guide breaks down faucet components and their functions in simple terms, empowering beginners with the knowledge to tackle faucet projects confidently and efficiently.
Ever stared at a faucet and wondered what all those bits and pieces actually do? You’re not alone! Faucets might seem simple, but their internal workings can feel like a mystery, especially when it’s time for a repair or replacement. Understanding the basic layout of a faucet is the first step toward confidently tackling these common home maintenance tasks.
It’s about demystifying the jargon and seeing how each part plays a role in delivering that essential stream of water. Don’t worry, we’re going to break it down into easy-to-understand steps so you can feel prepared and capable. Let’s dive in and get you comfortable with faucet anatomy!
Understanding Faucet Anatomy for DIY Success

When you’re starting with DIY home projects, especially plumbing, knowing the parts of common fixtures like faucets is key. It’s like learning the alphabet before you can read a book. For beginners, the “layout of faucet” simply means understanding the arrangement and function of its different components. This knowledge isn’t just for builders; it’s for anyone who wants to understand their home better, troubleshoot a leak, or even confidently pick out a new faucet.
We’ll explore the common parts you’ll find in most faucets, from the visibly obvious spout and handles to the less seen, but equally important, internal mechanisms like cartridges or stems. We’ll cover how they fit together and what happens when you turn that handle. By the end of this guide, the mystery of faucet layout will be solved, and you’ll be one step closer to mastering basic home repairs.
The Essential Faucet Parts: What You Need to Know

Let’s go through the core components of almost any faucet you’ll encounter. Think of these as the building blocks of your water delivery system at the sink. Knowing these parts will help you identify issues and make more informed decisions when buying new ones.
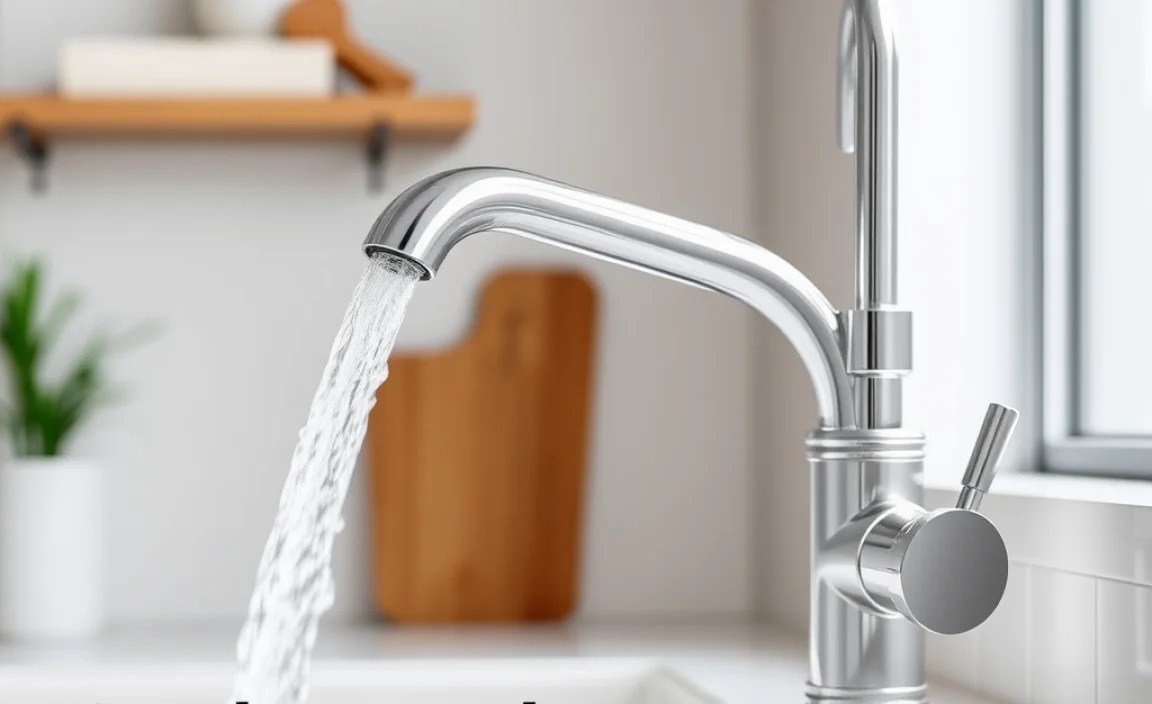
1. The Spout
This is the most visible part of your faucet – the part that actually directs the water into the sink basin. Spouts come in many shapes and sizes, from high-arc, gooseneck styles that offer more clearance for washing large pots, to shorter, more standard designs. Some spouts even have aerators built into their tip, which mixes air with water to create a smoother, splash-free stream.
2. The Handles
Handles are your primary interface with the faucet. They’re what you grab to turn the water on, off, and adjust its temperature and flow. You’ll typically find:
- Single-Handle Faucets: These have one lever that controls both water flow and temperature. Pushing it up increases flow, and moving it side-to-side adjusts temperature (usually left for hot, right for cold). They are very popular for their ease of use and modern look.
- Two-Handle Faucets: These feature separate handles for hot and cold water. This design gives you more precise control over the temperature but requires two hands to adjust the flow and temperature simultaneously. They often have a more classic or traditional aesthetic.
- Three-Handle Faucets: Less common in modern homes, these usually have a spout operated by one handle, and separate hot and cold handles. Sometimes, there’s also a third handle or lever that controls water diversion, like sending water to a showerhead or a bidet attachment.
3. The Valve and Cartridge (The Faucet’s Brain)
This is where the magic happens! Hidden beneath the handles are the internal mechanisms that control the water. The exact type can vary significantly based on the faucet’s design and age, but for most modern faucets, you’ll find one of these:
Ceramic Disc Cartridge
These are found in many modern, high-quality faucets. They use two durable ceramic discs that slide against each other to control water flow. One disc has openings that align with corresponding openings on the stationary disc. When you turn the handle, these openings move, allowing water to pass through. Ceramic discs are incredibly durable and resistant to wear and tear, making these cartridges long-lasting and less prone to leaks.
Ball Valve
Common in older single-handle faucets, ball valves use a rounded metal or plastic ball with openings that rotate to control water flow. As the ball turns, its openings line up with the hot and cold inlets, letting water through. These often have a slightly more complex internal assembly with springs and rubber seats that can wear out over time, leading to drips.
Compression Valve
This is one of the oldest and simplest faucet types, typically found in two-handle faucets. It works by using a rubber washer pressed against a valve seat to stop water flow. When you turn the handle, a screw mechanism (stem) raises the handle, which lifts the washer away from the seat, allowing water to flow. When you turn it off, the washer is pressed firmly against the seat, sealing the water. These are relatively easy to repair but the washers can become brittle and leak over time.
Understanding these valve types is crucial because if your faucet is leaking, the repair usually involves replacing a part within these mechanisms. For example, a common fix for a dripping faucet is replacing a worn-out washer in a compression valve or a faulty O-ring on a cartridge.
4. Aerator
Look at the very tip of the spout. That small, often removable, screen is the aerator. Its job is to mix air into the water stream. This does a few things:
- Reduces Splashing: By creating a softer, more solid stream of water.
- Saves Water: The aeration makes the stream appear fuller, so you use less water without feeling a loss in pressure.
- Filters Debris: It can catch sediment that might come through your pipes.
Aerators can get clogged with mineral deposits, affecting water flow and sometimes causing the water to spray erratically. Cleaning or replacing them is a simple maintenance task.
5. The Body and Internal Plumbing Connections
The faucet body is the external housing that holds all the internal components and connects to your water supply lines. The internal plumbing connections are where the hot and cold water pipes from your house feed into the faucet. These are usually threaded fittings that connect to flexible supply lines or directly to pipes. Ensuring these connections are secure and leak-free is vital for a proper faucet installation.
Types of Faucet Designs and Their Layouts

Faucets aren’t one-size-fits-all. Their design dictates not only their look but also their internal layout and how they operate. Here are some common types you’ll encounter:
Kitchen Sink Faucets
Kitchen faucets are often designed for functionality. They can be single-handle or two-handle, and many feature high-arc spouts to accommodate large pots and pans. Some advanced kitchen faucets also include pull-down or pull-out sprayers, which are integrated directly into the spout. This means the sprayer head is connected via a flexible hose that retracts back into the spout when not in use. The internal layout here involves a mechanism to switch water flow between the main spout and the sprayer head.
Bathroom Sink Faucets
Bathroom faucets are generally smaller than kitchen faucets. They typically come in three main configurations:
- Centerset Faucets: These have a wide base where the spout and handles are all mounted on a single piece. The entire unit is installed through three holes in the sink. The internal layout is streamlined as all components are integrated.
- Widespread Faucets: These have separate components (spout and two handles) that can be installed at varying distances apart, offering more design flexibility. This means individual shut-off valves and connections for each part, leading to a more complex internal plumbing layout beneath the sink. They require three holes in the sink or countertop.
- Single-Hole Faucets: As the name suggests, these combine the spout and handle (or a single handle for hot/cold control) into one unit installed through a single hole. This makes installation very simple and gives a clean, modern look. The internal mechanism is usually a cartridge housed within the single body.
Tub and Shower Faucets
These are more complex due to the need to control water to both the tub spout and the shower head, and often the temperature is controlled by a trim plate with a single handle. The valve body installed behind the wall is the most critical part. This valve directs water to either the tub spout or the shower head, and its internal cartridge regulates hot and cold water flow.
- Single-Handle Tub/Shower Faucets: A single handle controls the temperature and the flow. Pulling on the handle might turn the water on, pushing it in turns it off, and moving it left/right controls temperature. A diverter (often a knob on the spout or a lever on the handle) redirects water from the tub spout to the shower head. The underlying valve is sophisticated, managing multiple functions.
- Two-Handle Tub/Shower Faucets: These have separate handles for hot and cold. One handle might also incorporate a diverter mechanism, or there might be a separate diverter knob.
For tub and shower faucets, the “layout” also extends to the rough-in plumbing behind the wall, which is a more involved installation process. For beginners, focusing on the trim kit (handles, escutcheon plate) and the valve cartridge replacement is usually the most accessible part.
Tools You Might Need for Faucet Layout and Minor Adjustments

While the “layout” itself is about understanding parts, any hands-on work will require a few basic tools. You don’t need a professional’s arsenal, just a few essentials to handle most routine tasks like tightening a connection or replacing a cartridge.
- Adjustable Wrench: This is your go-to tool for loosening or tightening nuts and bolts. An 8-inch or 10-inch adjustable wrench is versatile for most tasks.
- Plumber’s Tape (PTFE Tape): Used to seal threaded pipe connections, preventing leaks. It’s a thin white tape that you wrap around the threads before screwing them together.
- Pipe Wrench: Useful for gripping and turning pipes, especially if they’re stubborn. Be careful not to overtighten or damage the pipes.
- Basin Wrench: A specialized tool designed to reach up behind the sink basin to tighten or loosen the nuts that hold the faucet in place. This is incredibly handy for faucet installation and removal.
- Screwdrivers: A Phillips head and a flathead screwdriver are essential for removing handle screws or other components.
- Pliers: Needle-nose pliers can be helpful for gripping small parts, and slip-joint pliers are good for a variety of tasks.
- Bucket and Towels: Always have these on hand to catch any residual water and clean up spills.
- Safety Glasses: Protect your eyes from any falling debris or water.
For more complex installations or repairs involving shut-off valves, you might also need a pipe cutter and fittings. However, for understanding the basic layout and performing simple maintenance, the list above will get you started.
Understanding Water Flow: The Path From Pipe to Pour
Imagine turning on your faucet. What actually happens inside? Understanding this flow path helps demystify how a faucet works and why certain parts fail.
- Water Supply: Hot and cold water lines from your home’s plumbing system enter the faucet body. These lines are typically connected via threaded fittings.
- Valve Control: This is where the core of the faucet’s mechanism resides. Depending on the faucet type (cartridge, ball, compression), the handles control the movement of internal components that regulate the flow of hot and cold water independently.
- Mixing (for hot/cold faucets): In single-handle faucets or two-handle faucets where you adjust temperature, the hot and cold water streams meet and mix within the valve assembly or just before exiting the spout. The position of the handle dictates the ratio of hot to cold water, thus controlling the final temperature.
- Flow to Spout: The mixed water then travels through internal channels within the faucet body towards the spout.
- Aeration: As water exits the spout and passes through the aerator, air is introduced, creating the stream you see.
This entire process is managed by the precise alignment and movement of the faucet’s internal parts. If any part of this pathway is obstructed (e.g., clogged aerator, mineral buildup in the valve) or fails to seal (e.g., worn-out washer or O-ring), you can experience issues like reduced water flow, leaks, or improper temperature control.
Common Faucet Problems and How Layout Understanding Helps
Knowing the layout of your faucet significantly simplifies troubleshooting. Here are common issues and how understanding the parts helps:
1. Dripping Faucet
- Cause: Usually a worn-out washer (in compression faucets), a damaged O-ring, a cracked cartridge, or a faulty valve seat.
- Layout Connection: Knowing if you have a compression, cartridge, or ball valve faucet tells you where to look for the worn part. For instance, with a compression faucet, you’ll check the rubber washer at the end of the stem. With a cartridge faucet, you’ll look at replacing the entire cartridge.
2. Low Water Pressure
- Cause: Can be a clogged aerator, mineral buildup within the faucet body or supply lines, or an issue with the main water supply to your home.
- Layout Connection: The aerator is at the spout tip – an easy place to check and clean. If that’s clear, you then consider internal blockages that might require partial disassembly.
3. Leaking Around Handles
- Cause: Often due to worn O-rings or seals around the faucet stem or cartridge.
- Layout Connection: Understanding how the handle connects to the valve mechanism (is it sitting on top of a stem, or directly manipulating a cartridge?) tells you which seals to inspect.
4. Difficulty Turning Handles
Cause: Mineral buildup or corrosion inside the valve mechanism, or a handle that’s not properly secured.
- Layout Connection: This points to issues within the valve or cartridge assembly. Sometimes, a thorough cleaning of these parts can resolve the issue.
For any of these issues, first identify your faucet type and its primary components. Then, consult the manufacturer’s guide or online resources specific to your faucet model. This targeted approach, informed by your understanding of faucet layout, makes repairs much more manageable.
Comparing Faucet Types: Key Differences in Layout and Functionality
Choosing a new faucet or understanding why your current one behaves a certain way often comes down to its fundamental design. Here’s a comparison to highlight how layout affects the user experience and maintenance.
| Feature | Compression Faucet | Ball Faucet | Cartridge Faucet | Ceramic Disc Faucet |
|---|---|---|---|---|
| Typical Use | Older two-handle faucets | Older single-handle faucets | Most modern faucets (single & double handle) | Modern, high-end faucets (single & double handle) |
| Internal Mechanism | Rubber washer compresses against a valve seat. Stem raises/lowers washer. | Rotating ball with slots controls water flow. Springs and rubber seats help seal. | A cylinder (cartridge) with internal ports controls water. | Two durable ceramic discs with precisely cut ports control flow. |
| Ease of Repair | Simple, but washers wear out. | Moderate; can have many small parts. | Moderate; often involves replacing the entire cartridge. | Simple; usually replace the cartridge. Extremely durable. |
| Durability | Moderate; washers need periodic replacement. | Good, but springs/seats can wear. | Very Good; cartridges are robust. | Excellent; ceramic discs are very hard and resist wear. |
| Leak Susceptibility | Higher, especially from worn washers. | Moderate; wear on seats or ball. | Low; good seals. | Very Low; ceramic discs are highly resistant. |
| Water Flow Control | Precise temperature control with two handles. Flow controlled by handle turn. | Easy, smooth single-handle operation for flow and temp. | Smooth operation, good flow and temp control. | Very smooth, precise control, excellent for ergonomics. |
As you can see, modern faucets using ceramic disc cartridges are the most durable and easiest to maintain for common issues like leaks. Understanding which type you have is the first step in knowing what to expect in terms of reliability and repair. For new installations or upgrades, consider faucets with ceramic disc cartridges for their longevity and ease of use.
