
Upgrade your bathroom in 2025 with smart shelf solutions! Discover essential styles for organization and decor, from floating designs to corner units. This guide simplifies choosing and installing shelves to maximize your space and boost your bathroom’s look and feel.
Your bathroom is a busy place, and keeping it tidy can feel like a constant battle. Towels, toiletries, decor – it all adds up! If your bathroom feels a bit cluttered or lacks that stylish touch, shelves are a fantastic and easy fix. You don’t need to be a master carpenter to add them. We’ll walk you through the best bathroom shelf ideas for 2025, making it simple to find options that fit your space and your style. Get ready to transform your bathroom from chaotic to calm and chic!
Why Add Shelves to Your Bathroom?

Adding shelves to your bathroom is a game-changer for several reasons. They’re not just about making things look neater; they actively improve your bathroom’s functionality and aesthetics.
Maximizes Space: Bathrooms, especially smaller ones, often feel cramped. Shelves utilize vertical space, turning empty walls into valuable storage real estate. This is especially helpful for holding everything from spare toilet paper rolls to decorative items.
Improves Organization: No more digging through cabinets! Shelves make it easy to see and reach your everyday essentials. This is great for keeping things like soaps, lotions, and styling tools handy.
Enhances Decor: Shelves are perfect for showcasing your personality. You can display small plants, framed photos, scented candles, or artwork, turning a utilitarian space into a more inviting one.
Increases Efficiency: When everything has its place and is easily accessible, your morning and evening routines become smoother and less stressful.
Essential Bathroom Shelf Styles for 2025

Choosing the right shelf style depends on your bathroom’s size, your storage needs, and your design preferences. Here are some of the most popular and practical options for 2025:
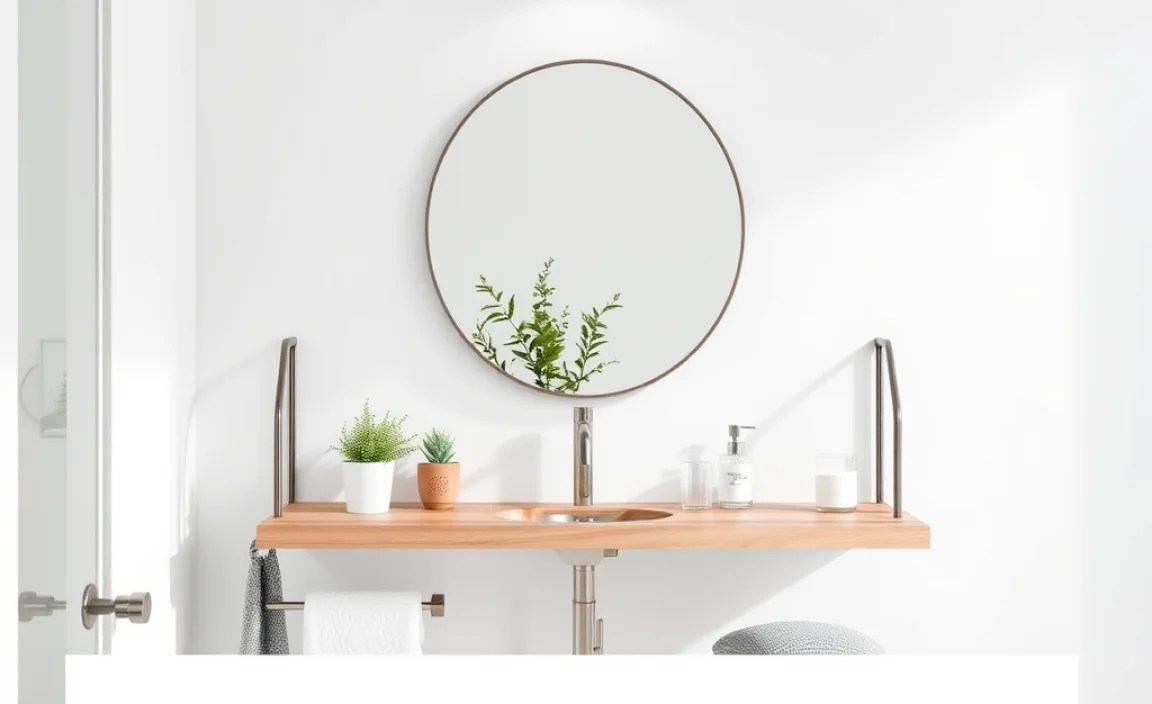
1. Floating Shelves: Sleek and Modern
Floating shelves are a top choice for a clean, minimalist look. They appear to defy gravity because the mounting hardware is hidden, creating a seamless appearance. These shelves are perfect for displaying decorative items or holding a few essentials like small plants or bottles of perfume.
- Pros: Very modern and clean look, visually light, easy to install for most DIYers.
- Cons: Might not hold as much weight as traditional shelves, require secure wall mounting.
- Best For: Displaying decor, light storage, modern or minimalist bathrooms.
When installing floating shelves, focus on finding wall studs for maximum support. You can learn more about locating wall studs from resources like This Old House, a trusted name in home improvement.
2. Corner Shelves: Smart Use of Awkward Space
Don’t let those awkward corners go to waste! Corner shelves are designed to fit snugly into any 90-degree corner, making them excellent for bathrooms where wall space is at a premium. They come in various styles, from simple triangular units to more elaborate tiered designs.
- Pros: Excellent for maximizing unused corner space, can add a lot of storage without taking up much visual room.
- Cons: Can sometimes feel a bit dated if not chosen thoughtfully, access to items at the back can be tricky.
- Best For: Small bathrooms, shower areas (for shampoo and soap), corners of rooms.
Shower corner shelves are particularly useful. They keep your bathing essentials organized and within easy reach, preventing clutter around your tub or shower base. Look for materials that are water-resistant, like stainless steel or treated wood.
3. Ladder Shelves: Stylish and Versatile
Ladder shelves bring a touch of rustic charm or contemporary flair, depending on their material and design. They lean against the wall, offering multiple shelves at different heights. They’re fantastic for towels, baskets of toiletries, or even a few curated decor pieces.
- Pros: Visually interesting, easy to move and reposition (if not fixed), offers tiered display options.
- Cons: Takes up floor space, might need anchoring for stability, items can fall off if not placed carefully.
- Best For: Bathrooms with a bohemian, rustic, or modern farmhouse style, storing rolled towels.
Consider a wooden ladder shelf for a warm, natural feel, or a metal one for a more industrial or modern bathroom. Ensure it’s stable and doesn’t wobble before loading it up.
4. Built-In Niches: Seamless and Sophisticated
For a truly integrated look, consider built-in niches. These are essentially recessed shelves created within the wall during a renovation or remodel. They offer a clean, custom look and don’t protrude into the room, making them ideal for showers.
- Pros: Extremely clean and integrated look, does not take up any floor or wall space, can be waterproofed for shower use.
- Cons: Requires significant renovation work, permanent, and can be expensive.
- Best For: New builds or major bathroom renovations, shower spaces, creating a high-end look.
Waterproofing is crucial for shower niches. Materials like proper tile, grout, and waterproofing membranes are essential to prevent leaks and mold. Consult a professional or research waterproofing techniques thoroughly if undertaking this yourself. The Houzz website offers great visual guides on this aspect.
5. Over-the-Toilet Shelving Units: Space-Saving Wonders
These are freestanding units that sit above your toilet. They’re a brilliant solution for renters or for those who don’t want to drill into their bathroom walls. They typically offer two or three shelves, ideal for storing toilet paper, toiletries, or decorative items.
| Over-the-Toilet Shelf Pros & Cons | |
| Pros | Cons |
| Easy to install, no drilling required for most models. | Can sometimes look a bit generic or “big box store.” |
| Provides significant storage in a tight space. | May not fit all toilet designs or heights. |
| Portable; can be moved if needed. | Can obstruct access to the tank for maintenance. |
When choosing an over-the-toilet unit, measure the height of your toilet tank and the available space in your bathroom carefully. Ensure there’s enough clearance for easy access and that the unit is stable.
6. Wall-Mounted Cabinet Shelves: Concealed Storage
These offer the best of both worlds: shelves for display and a cabinet for hiding clutter. They provide dust-free storage for items you want to keep out of sight, while any open shelves can be used for decor or frequently used items. They come in various styles, from modern glass-fronted cabinets to traditional wood-paneled ones.
- Pros: Offers both open display and concealed storage, protects items from dust and moisture, adds a finished look.
- Cons: Can be bulkier than simple shelves, installation may require more effort depending on size and weight.
- Best For: Storing toiletries, medicine, makeup, and other items you want to keep tidy.
Look for medicine cabinets with adjustable shelves to customize the space to fit your needs, whether it’s for oversized bottles or smaller items.
7. Towel Shelves & Racks: Functional and Stylish
While not solely for storage, shelves specifically designed for towels can be beautiful additions. These can range from simple wall-mounted bars with a shelf above to more elaborate étagères. They keep towels neatly folded or hung, adding a spa-like feel to your bathroom.
- Pros: Keeps towels organized and accessible, can be a decorative element.
- Cons: Primarily for towels, limited general storage.
- Best For: Organizing bath and hand towels, adding a touch of hotel luxury.
Consider a heated towel rack for an extra touch of luxury, especially in colder climates. These can also help dry towels quickly, preventing dampness and odors.
Choosing the Right Material for Your Bathroom Shelves

The material of your bathroom shelves is as important as their style. Bathrooms typically have higher humidity levels, so durability and moisture resistance are key.
Common Shelf Materials:
- Wood:
- Pros: Natural beauty, warm look, versatile.
- Cons: Can warp or rot if not sealed properly, susceptible to moisture damage.
- Tip: Opt for hardwoods like oak or teak, or ensure any wood is well-sealed with a moisture-resistant varnish or paint.
- MDF (Medium-Density Fibreboard) or Particleboard:
- Pros: Inexpensive, easy to work with, often painted for a smooth finish.
- Cons: Very susceptible to moisture damage, can swell and disintegrate.
- Tip: Best used in low-moisture areas or when thoroughly sealed and painted with a moisture-resistant finish; not ideal for shower areas.
- Metal (Stainless Steel, Chrome, Powder-Coated Steel):
- Pros: Highly durable, water-resistant, modern or industrial look.
- Cons: Can be cold to the touch, prone to rust if coating is damaged (except for stainless steel).
- Tip: Stainless steel is excellent for humid environments like bathrooms and showers.
- Glass:
- Pros: Sleek, modern, makes the space feel larger, easy to clean.
- Cons: Can be fragile, shows water spots and smudges easily, limited weight capacity.
- Tip: Use tempered glass for added safety. Opt for frosted glass for privacy or to hide contents.
- Acrylic/Lucite:
- Pros: Lightweight, modern, transparent look, less fragile than glass.
- Cons: Can scratch easily, may yellow over time with sun exposure.
- Tip: Good for a contemporary feel where lighter visual weight is desired.
For shower shelves, materials like stainless steel, treated wood, or ceramic tile are excellent choices due to their moisture resistance. For general bathroom use, you have more flexibility.
How to Install Bathroom Shelves: A Beginner’s Guide

Installing most shelves is a manageable DIY project. The key is careful planning and using the right tools. Here’s a general step-by-step guide. Always refer to the specific instructions that come with your shelf hardware.
Tools You Might Need:
Having the right tools makes the job much easier and safer. For most installations, you’ll likely need:
- Drill with appropriate drill bits
- Level
- Stud finder
- Measuring tape
- Pencil
- Screwdriver (often compatible with your drill)
- Wall anchors (if not drilling into studs)
If you’re unsure about using a drill, or need to buy one, checking out reviews for beginner-friendly drills from sites like Family Handyman can be a good starting point.
Step-by-Step Installation:
- Choose the Location: Decide where you want your shelf to go. Consider what you’ll be storing and how high it should be for easy access.
- Locate Wall Studs: This is crucial for sturdy shelves, especially for heavier items. Use a stud finder to mark the center of at least one stud where the shelf will be mounted. If you can’t hit a stud, you’ll need to use appropriate wall anchors.
- Mark Shelf Placement: Hold the shelf or its bracket against the wall at the desired height. Use your level to ensure it’s perfectly straight. Lightly mark with a pencil where the screw holes will go, aligning with your stud marks or anchor locations. Using a level is critical; even a slight angle can make shelves look unprofessional or cause items to slide off.
- Drill Pilot Holes: Using a drill bit slightly smaller than your screws, drill pilot holes at your marked locations. If drilling into studs, this prevents the wood from splitting. If using wall anchors, follow the anchor’s specific instructions for hole size.
- Install Wall Anchors (If Needed): If you are not drilling into a stud, insert your wall anchors into the pilot holes according to the anchor’s instructions.
- Attach the Shelf Bracket(s): Position the shelf bracket(s) over the pilot holes or anchors. Drive screws through the bracket into the studs or anchors. Make sure they are secure and tight.
- Install the Shelf: Slide or attach the shelf onto the bracket(s). Some shelves simply rest on brackets, while others might have small screws on the underside to secure them.
- Test Stability: Gently press down on the shelf to ensure it’s secure. Place a few items on it and check again for any wobbling.
Remember, safety first! If you’re drilling into walls that might have pipes or electrical wires, proceed with extreme caution or consult a professional. For more detailed guidance on wall mounting, resources like Lowe’s offer helpful tutorials.
Bathroom Shelf Decor Ideas
Once your shelves are installed, it’s time for the fun part: styling them! Your shelves are a prime spot to express your personal style and make your bathroom feel more like a sanctuary.
Displaying Essentials Stylishly:
- Elevate Your Towels: Instead of just stacking, try rolling your bath towels neatly and placing them on a shelf. This looks particularly good on ladder shelves or wider floating shelves.
- Curate Your Toiletries: Decant shampoos, conditioners, and lotions into uniform, attractive bottles. This instantly makes your shelf look less cluttered and more luxurious. Grouping similar items together also creates visual harmony.
- Add Greenery: Small, humidity-loving plants like a snake plant, spider plant, or a ZZ plant can add a vibrant touch of life and color. Make sure they get a bit of indirect light.
- Incorporate Scent: Place a scented candle, a reed diffuser, or a small dish of potpourri on a shelf. This adds a lovely aroma and a decorative element.
- Personal Touches: Display framed photos, small pieces of art, or decorative objects that you love. These personal touches make the space uniquely yours.
- Utilize Baskets and Trays: Small woven baskets or stylish trays are perfect for corralling smaller items like cotton balls, makeup brushes, or spare soaps. They keep things tidy while adding texture.
Think of your shelves as a mini art installation. Aim for a balance of items and negative space so it doesn’t look too cluttered. The general rule of thumb for visual appeal is the “rule of three” – arranging items in odd numbers often looks more pleasing.
Frequently Asked Questions About Bathroom Shelves
Q1: How high should bathroom shelves be installed?
For general use, aim for shelves to be about 4 to 5 feet (120-150 cm) from the floor. If they’re above a vanity, place them high enough so they don’t interfere with overhead lighting or mirrors, usually starting about 15-20 inches (40-50 cm) above the counter. For shelves in a shower, they should be within easy reach, typically between 3-5 feet (90-150 cm) from the shower floor.
Q2: What are the best materials for shelves in a wet shower area?
The best materials are those that resist moisture and won’t degrade. Excellent options include stainless steel, ceramic tile (with properly sealed grout), and treated or naturally water-resistant woods like teak. Avoid particleboard or untreated wood, which can swell and decay.
Q3: Do I need to find a stud to install shelves?
It’s highly recommended to install shelves into wall studs whenever possible, especially if you plan to store heavier items. If you cannot attach to a stud, you must use appropriate wall anchors (like toggle bolts or heavy-duty drywall anchors) designed to hold the weight you intend to place on the shelf. Always check the weight rating of your anchors.
