
Discover the perfect soap holder: Essential details for a tidy shower and a long-lasting bar of soap. Learn how the right holder prevents mess, prolongs soap life, and enhances your bathroom’s look.
Tired of soggy soap bars and messy soap dishes? A simple soap holder can make a world of difference in your bathroom. It keeps your soap dry, your counters clean, and your bar lasting much longer. We’ve all faced that slippery, melting blob of soap that leaves a gooey mess. But don’t worry, choosing the right soap holder is easier than you think! This guide will walk you through all the essential details you need to know to find the perfect one for your needs.
Why a Good Soap Holder is a Bathroom Essential

A soap holder isn’t just a place to put your soap; it’s a functional accessory that plays a vital role in bathroom hygiene and organization. Think of it as your bar of soap’s personal best friend, ensuring it stays in prime condition.
Prevents Soap Dissolving: The primary job of a soap holder is to keep excess water away from your soap. When soap sits in standing water, it starts to dissolve, turning into a mushy mess. A well-designed holder allows water to drain away, keeping your soap firm and dry.
Extends Soap Life: By preventing premature dissolving, a good soap holder significantly increases the lifespan of your favorite bar soaps. This means you’ll be buying soap less often, saving you money in the long run.
Maintains Bathroom Cleanliness: A soggy soap bar often leaves residue on surfaces like sinks, shower ledges, and tubs. A soap holder contains this mess, making your bathroom look tidier and cutting down on cleaning time.
Enhances Shower Aesthetics: Modern soap holders come in a variety of styles, materials, and designs that can add a touch of elegance or a pop of color to your bathroom décor.
Types of Soap Holders: Finding Your Perfect Match

When it comes to soap holders, there’s a surprisingly wide range of options available. Each type serves a slightly different purpose and fits various bathroom setups. Knowing the differences can help you make an informed decision.
1. Draining Soap Dishes
These are the most common type of soap holder. They are designed with small holes or slats to allow water to drain out, keeping the soap elevated and dry.
Materials: Commonly made from plastic, ceramic, stainless steel, bamboo, or even natural stone. Plastic is budget-friendly, ceramic offers a classic look, bamboo is eco-friendly, and stainless steel provides durability.
Pros:
Excellent drainage, keeping soap dry.
Wide variety of styles and price points.
Easy to clean.
Cons:
Can still accumulate soap residue in the drainage holes.
May slide around on some surfaces if not weighted or secured.
2. Soap Saver Bags (or Pouches)
These are mesh bags or pouches designed to hold a bar of soap. You place the soap inside, lather it up directly in the bag, and then hang it to dry.
Materials: Typically made from sisal, nylon, or other synthetic mesh materials.
Pros:
Creates a rich lather, reducing soap usage.
Great for using up small soap slivers.
Easy to hang and dry.
Portable for travel.
Cons:
The mesh can sometimes hold onto moisture, requiring thorough drying.
Not as visually appealing as a traditional dish for some.
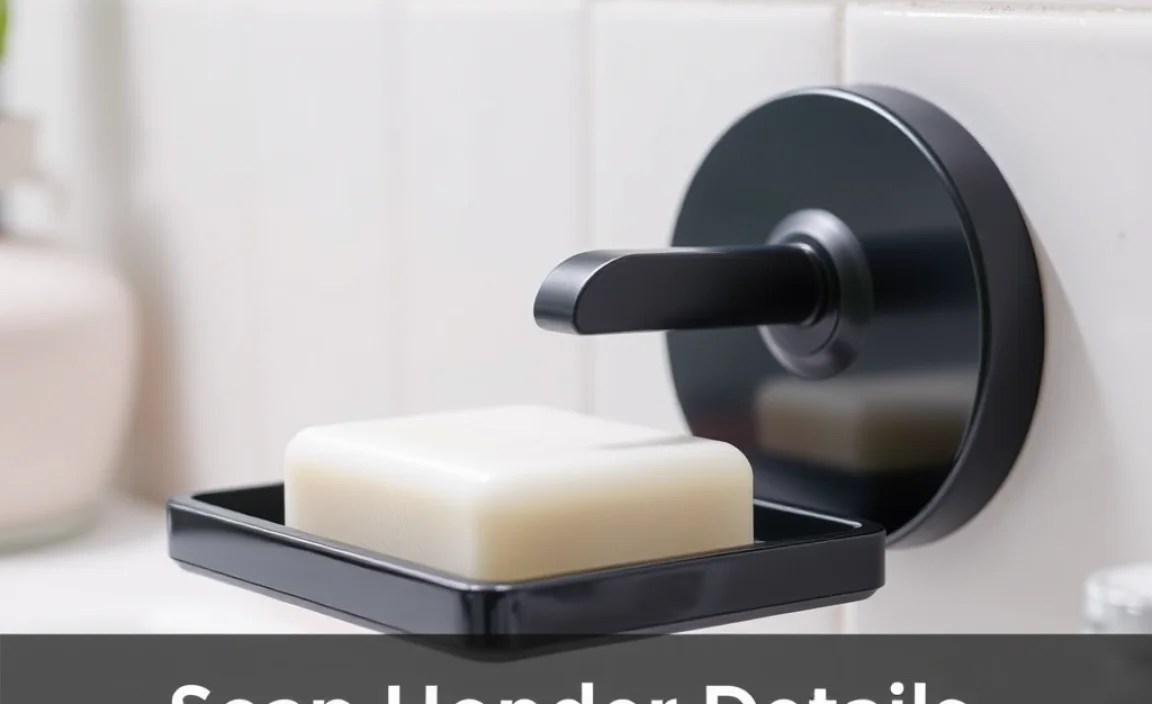
3. Wall-Mounted Soap Holders
These holders are designed to be attached directly to the shower wall or tiles. They often feature a bar, a shelf, or a magnetic system.
Types:
Suction Cup Holders: Easy to install and remove, good for renters. May lose suction over time.
Adhesive Holders: Stick firmly to the wall, offering more stability than suction cups. Can be tricky to remove without damaging paint or tiles.
Screw-In Holders: The most secure option but require drilling holes, making them permanent.
Magnetic Holders: A small metal disc attaches to the soap, and a magnetic holder attaches to the wall. The soap sticks to the magnet.
Pros:
Saves counter and sink space.
Keeps soap cleanly off surfaces.
Magnetic options are very clean and modern.
Cons:
Installation can be an issue (drilling, adhesive removal).
Suction cups can fail.
Magnetic discs can sometimes fall off if not securely attached to the soap.
4. Shower Caddies and Shelves with Soap Holders
Larger shower organizers often include a dedicated space for soap. These can be showerheads with integrated shelves, corner units, or tension-rod caddies.
Pros:
Organizes multiple shower items, not just soap.
Keeps everything within easy reach.
Cons:
Can be bulky.
Drainage might be an issue depending on the design.
5. Corner Soap Dishes
Specifically designed to fit into shower corners, these dishes often have drainage holes and a sloped design to help water run off.
Pros:
Utilizes often-wasted corner space effectively.
Typically feature good drainage.
Cons:
Limited to corner placement.
Key Details to Consider When Choosing Your Soap Holder

Selecting the right soap holder involves looking beyond just its appearance. Several functional details can significantly impact its usefulness and your satisfaction.
1. Drainage Capability
This is arguably the most critical feature. A soap holder must allow water to escape.
Holes vs. Slats: Holders with multiple small holes or raised slats allow air circulation and water drainage. A solid dish with no drainage will just create a pool for your soap to sit in.
Sloped Design: Many effective holders have a slight slope, encouraging water to run off towards the drainage holes rather than pooling.
2. Material and Durability
The material affects the holder’s look, price, and longevity.
Plastic: Lightweight, inexpensive, and comes in many colors. Can sometimes look cheap and might crack over time.
Ceramic/Porcelain: Classic, elegant, and easy to clean. Can be heavy and fragile, prone to chipping or breaking if dropped. For a good understanding of material properties in bathroom fixtures, you can refer to resources like The American Ceramic Society’s insights into ceramic fixtures.
Stainless Steel: Durable, rust-resistant, and has a modern look. Can be more expensive than plastic.
Bamboo/Wood: Eco-friendly, naturally antimicrobial, and adds a natural warmth. Needs to be well-sealed to prevent water damage and mold. Requires more care than plastic or metal.
Silicone: Flexible, non-slip, and easy to clean. Might harbor mold if not dried properly.
3. Size and Soap Fit
Make sure the holder is appropriately sized for your bar of soap.
Bar Size: Some holders are quite small, best for travel-sized bars or thin artisanal soaps. Others are larger and can accommodate bigger family-sized bars.
Depth: A deeper dish can help prevent soap from slipping out, especially if you have a small bar.
4. Ease of Cleaning
A soap holder needs to be cleaned regularly to prevent soap scum buildup and mildew.
Removable Parts: Some holders have removable trays or grids that make cleaning simpler.
Smooth Surfaces: Materials like ceramic and stainless steel are generally easier to wipe down than porous materials.
5. Mounting Method (If Applicable)
If you’re considering a wall-mounted or shower-mounted holder, the attachment method is crucial.
Adhesive Strength: For adhesive types, check reviews for how well the adhesive holds up in a steamy shower environment.
Suction Cup Quality: Look for holders with strong, wide suction cups.
Drilling vs. No Drilling: Decide if you’re comfortable drilling into your shower or wall. Some people prefer non-permanent solutions like command strips or adhesive if drilling isn’t an option.
6. Style and Aesthetics
The soap holder should complement your bathroom’s overall design.
Color: Match or contrast with your tiles, fixtures, or accessories.
Shape: From minimalist designs to decorative, ornate pieces, there’s a shape to suit every taste.
Finish: Matte, glossy, brushed, polished – the finish can impact the look significantly.
Quick Comparison: Soap Holder Features Table
To help you visualize the differences, here’s a quick table comparing popular soap holder types:
| Holder Type | Best For | Drainage | Mounting | Aesthetics | Key Consideration |
|---|---|---|---|---|---|
| Draining Dish | General use, sink or shower ledge | Excellent (holes/slats) | Freestanding | Varies widely (plastic, ceramic, bamboo) | Material choice, stability on surface |
| Soap Saver Bag | Travel, maximizing lather, using slivers | Good (mesh allows drying) | Hanging | Functional, less decorative | Ensuring bag dries fully |
| Wall-Mounted (Adhesive/Suction) | Saving counter space, streamlined look | Good (often sloped with holes) | Adhesive or Suction Cup | Modern, sleek | Adhesive strength/removal, suction durability |
| Wall-Mounted (Magnetic) | Minimalist look, very clean | Excellent (soap is suspended) | Magnet Attachment | Chic, modern | Secure attachment of magnet to soap |
| Shower Caddy Slot | Integrated bathroom organization | Varies by caddy design | Hangs on shower head/rod | Functional, part of larger unit | Overall caddy drainage and stability |
Step-by-Step: Installing Common Soap Holders

Let’s break down how to install some of the most popular types of soap holders so you can get them set up without a hitch.
Installing a Freestanding Draining Soap Dish
This is the simplest of them all – no installation required!
1. Choose Location: Decide where you want to place the soap dish. A flat, stable surface near your sink or inside your shower is ideal. Ensure it won’t be constantly splashed with water.
2. Clean Surface: Wipe down the chosen area to remove any dust or residue.
3. Place Holder: Simply place the soap dish on the surface. If it feels wobbly, try a different spot or consider a holder with a non-slip base.
4. Insert Soap: Place your dry bar of soap into the dish. For best results, let the soap air dry for a short while before placing it in the dish after each use.
Installing a Wall-Mounted Adhesive Soap Holder
Adhesive holders are a great option when you don’t want to drill, but they require careful application.
Tools/Materials:
Wall-mounted soap holder kit (usually includes holder, adhesive backing, and often a template)
Clean cloths or paper towels
Rubbing alcohol or suitable cleaner for the mounting surface
Screwdriver (if it uses a screw-in secondary lock or if you need to attach the holder to the plate)
Level (optional, but recommended for a straight installation)
Steps:
1. Prepare the Area: Crucially, choose a smooth, non-porous, clean, and dry surface. This could be a smooth tile, glass, or certain types of finished metal. Avoid grout lines, textured surfaces, or freshly painted walls.
2. Clean Thoroughly: Wipe the chosen spot with rubbing alcohol or a specialized tile cleaner. Allow it to dry completely. This removes grease and residue that can prevent the adhesive from sticking.
3. Mark Placement: Many adhesive holders come with a template or guide. Use this to mark the exact spot on your wall. A level can help ensure it’s straight.
4. Apply Adhesive: Carefully peel off the protective backing from the adhesive strip(s) on the holder or mounting plate. Avoid touching the adhesive itself.
5. Press Firmly: Position the holder (or mounting plate) precisely on your marked spot. Press down very firmly for at least 30-60 seconds. Apply even pressure across the entire surface of the adhesive to ensure a strong bond.
6. Wait (Important!): This is vital. Most adhesives require a curing time before they can bear weight. Check the manufacturer’s instructions. It can range from a few hours to 24-48 hours. Do not hang the soap or place it on the holder until this period has passed.
7. Attach Soap Holder (if separate): If the holder attaches to a separate mounting plate, slide or click it into place now, following the manufacturer’s directions.
8. Test Gently: Once cured, gently test the holder with a light touch before placing your full soap bar on it.
For more information on wall preparation for adhesives, especially in humid environments, resources from adhesive manufacturers like 3M offer great insights into surface preparation.
Installing a Wall-Mounted Suction Cup Soap Holder
Suction cup holders are convenient for renters or those who like flexibility, but their adhesion can be finicky.
Tools/Materials:
Suction cup soap holder
Clean cloth
Water
Steps:
1. Choose Location: Select a smooth, non-porous surface. Highly polished tiles, glass shower doors, or smooth metal are best. Grout lines and textured surfaces will not work.
2. Clean the Surface: Wipe the area with a damp cloth to remove any soap scum or grime.
3. Lubricate Suction Cup (Optional but Recommended): Lightly moisten the rim of the suction cup with water. This helps create a better seal. Some people also use a tiny bit of petroleum jelly or a mild soap solution.
4. Position and Press: Press the suction cup firmly against the clean, chosen spot on the wall.
5. Engage Mechanism: Many suction cup holders have a lever or button that you push or flip to create a strong vacuum seal. Ensure this mechanism is fully engaged.
6. Test: Gently tug on the holder to ensure it’s secure. If it slips, try again, ensuring the surface is cleaner and you’ve applied firm, even pressure. Suction cups can lose their stickiness over time, especially in humid environments, and may need to be reapplied.
Installing a Magnetic Soap Holder
These are sleek and incredibly effective if installed correctly.
Tools/Materials:
Magnetic soap holder kit (usually includes a small metal disc and a wall-mounted magnet)
Small hammer or mallet (if the holder requires a small screw or anchor to secure the magnet)
Drill (if your magnet requires a screw/anchor and you choose to use one for extra security)
Pliers (optional, for removing older anchors if applicable)
Steps:
1. Prepare the Soap: Most magnetic holders come with a small, strong metal disc. You’ll need to attach this to your bar of soap. Often, it has a pronged end. Press this disc firmly into the center of the soap bar, ensuring the prongs are fully embedded. Be careful not to break the soap apart.
2. Choose Wall Location: Decide where you want the magnetic holder to be. It will attach to a flat surface, often on the shower wall or tile edge.
3. Install the Magnet:
Adhesive Magnet: Many come with strong adhesive. Clean your chosen wall surface thoroughly (as described for adhesive holders). Peel the backing and press the magnet firmly onto the wall. Wait for the adhesive to cure per instructions (often 24 hours).
Screw-In Magnet: Some magnetic holder systems use a small screw and anchor to secure the magnet. For maximum security, locate a stud if possible. If not, use the provided anchor. You may need to drill a small pilot hole. Follow the manufacturer’s instructions carefully.
4. Test Magnetic Pull: Once the magnet is securely attached to the wall and any adhesive has cured or screws are tightened, test its strength.
5. Attach Soap: Bring the soap bar (with the metal disc embedded) close to the magnet. It should snap into place securely.
Tips for Maintaining Your Soap Holder and Bar of Soap
Your soap holder is a partner in keeping your soap in tip-top shape. Here’s how to help them both last longer:
Soap Holder Maintenance:
Regular Washing: Even with drainage, soap residue can build up. Wash your holder with warm, soapy water at least once a week. Use an old toothbrush to get into crevices and drainage holes.
Deep Cleaning: For stubborn residue or mold, use a diluted vinegar solution or a mild bathroom cleaner. Rinse thoroughly.
