
A “system of an exhaust fan” refers to its components and how they work together to remove stale air. For beginners, understanding this means knowing how to install, maintain, and troubleshoot your fan to keep your home fresh and healthy. This guide simplifies everything you need to know to manage your exhaust fan system with confidence.
Ever walked into a bathroom after a steamy shower, only to be met with a foggy mirror and a damp smell? Or perhaps your kitchen feels a bit too warm and smoky after a quick stir-fry? These are common signs that your exhaust fan system isn’t quite doing its job. It can be frustrating when these little home helpers aren’t working efficiently, but don’t worry! Understanding how your exhaust fan works, and what makes up its system, is simpler than you think. We’ll break down the jargon and guide you through the essentials, giving you the confidence to keep your home’s air fresh and clean. Get ready to master your exhaust fan system, one simple step at a time!
This guide will cover everything from the basic parts of an exhaust fan system to how to keep it running smoothly. We’ll explore different types of fans, discuss installation basics, and provide essential maintenance tips. You’ll learn how to troubleshoot common problems, ensuring your home stays comfortable and healthy year-round. Let’s dive in and demystify the world of exhaust fans for you!
What Exactly is an Exhaust Fan System?

Think of your exhaust fan system as your home’s little air traffic controller. Its primary job is to move stale, moist, or contaminated air from one area of your home, like a bathroom or kitchen, and send it outside. This process is crucial for maintaining good indoor air quality, preventing moisture buildup that can lead to mold and mildew, and removing odors and cooking fumes. A complete exhaust fan system involves several key components working together seamlessly.
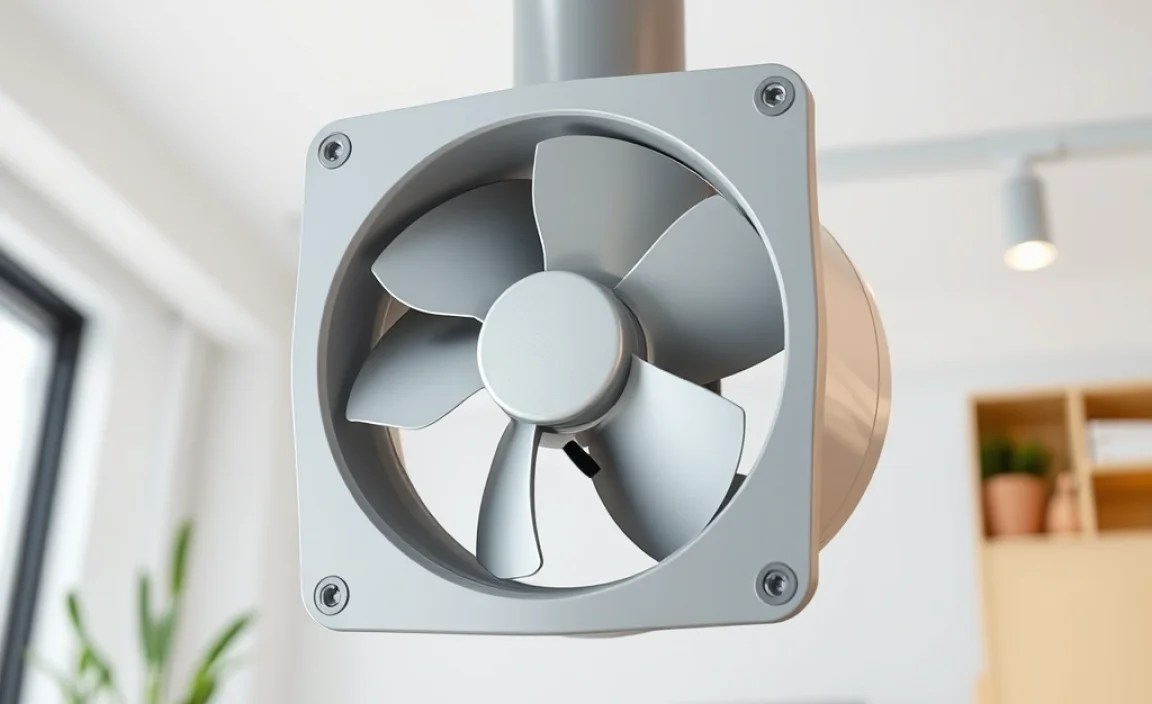
At its core, an exhaust fan system includes the fan unit itself, ductwork, and an external vent. Each part plays a vital role. The fan unit is the powerhouse, the ductwork is the highway for air, and the external vent is the exit. Ensuring all these pieces are in good condition and properly connected is what we mean by understanding the “system of exhaust fan for beginners.” It’s not just about the fan you see on the ceiling; it’s the whole setup that makes it work effectively.
The Key Components of Your Exhaust Fan System
To truly understand your exhaust fan system, let’s break down its essential parts. Each component has a specific function that contributes to the overall goal of ventilating your home.
- The Fan Unit (or Housing): This is the part you typically see installed in your ceiling or wall. It contains the motor and the fan blades. The motor powers the fan blades, which spin to create suction, drawing air into the unit.
- Ductwork: This is a system of tubes or pipes that connect the fan unit to the outside of your house. It’s like a dedicated pathway for the air to travel. The size and material of the ductwork are important for efficient airflow.
- Exterior Vent Hood/Cap: This is the cover on the outside of your house where the ductwork terminates. It allows the exhausted air to escape while preventing pests, rain, and debris from entering the ductwork. Many vent hoods have a backdraft damper – a flap that closes when the fan isn’t running to stop outside air from coming in.
- Electrical Connection: The fan needs power to operate. This involves wiring connected to your home’s electrical system, often controlled by a light switch or a dedicated timer switch.
- Filter (in some models): Some exhaust fans, particularly those used in kitchens or for specific air quality needs, might have filters to trap grease or particles before the air is vented outside.
By understanding these basic parts, you can better appreciate how your exhaust fan works and what might be causing issues if it’s not performing as it should.
Why is an Exhaust Fan So Important?

You might think of an exhaust fan as just a noisy contraption, but its role in your home’s health and comfort is significant. These fans are workhorses that combat several common indoor issues, making your living space more pleasant and preventing potential damage.
One of the biggest benefits is controlling moisture. Bathrooms and kitchens are prime spots for this. After a shower or while cooking, water vapor fills the air. Without an exhaust fan, this moisture can cling to surfaces, leading to:
- Mold and Mildew Growth: Damp environments are perfect breeding grounds for mold and mildew, which can cause respiratory problems and damage your home’s structure and finishes.
- Peeling Paint and Wallpaper: Excessive moisture can cause paint to blister and wallpaper to peel away from the walls.
- Damage to Woodwork: Prolonged dampness can lead to rot and warping of wooden fixtures, cabinets, and even structural elements over time.
Beyond moisture, exhaust fans tackle other air quality issues:
- Odor Removal: From bathroom smells to lingering cooking odors, exhaust fans quickly clear the air, keeping your home smelling fresh.
- Removal of Pollutants: Kitchen exhaust fans, especially those over stovetops, are crucial for removing cooking byproducts like smoke, grease particles, and other volatile organic compounds (VOCs) that can be harmful to your health. According to the U.S. Environmental Protection Agency (EPA), proper ventilation is key to reducing indoor air pollution.
- Reducing Heat and Humidity: In hot weather or during strenuous cooking, exhaust fans can help remove excess heat and humidity, making your home more comfortable.
In essence, your exhaust fan system is a crucial line of defense for maintaining a healthy, comfortable, and well-preserved home environment. It’s a simple installation that pays significant dividends in the long run.
Types of Exhaust Fans for Your Home

Walk into any home improvement store, and you’ll see a variety of exhaust fans, each designed for specific needs and applications. While they all perform the basic function of air removal, understanding the differences will help you choose the right one or better understand the system you already have.
Bathroom Exhaust Fans
These are perhaps the most common. Their primary goal is to remove moisture and odors from bathrooms. They typically come in several forms:
- Standard Ceiling Mounted Fans: These are the most prevalent. They are installed in the ceiling, often ducted to the outside through the attic or joist space.
- Fan/Light Combos: Many bathroom fans integrate a light fixture, providing both ventilation and illumination from a single ceiling point.
- Fan/Light/Heater Combos: For those with particularly cold bathrooms, these units offer ventilation, light, and a built-in heater.
- Fan/Light/Night Light Combos: A niche but available option, these offer a dim night light along with ventilation and a primary light.
Kitchen Exhaust Fans
Kitchens have more demanding ventilation needs due to grease, smoke, and cooking odors. The system here often involves two key types:
- Range Hoods: These are installed directly above the cooktop. They combine a fan and a light, often with grease filters.
- Ducted Range Hoods: These are the most effective. They capture smoke and grease and vent them directly outside through ductwork.
- Ductless (Re-circulating) Range Hoods: These hoods filter the air and then recirculate it back into the kitchen. They are less effective at removing heat and moisture and primarily target odors and some grease, often utilizing charcoal filters. They are chosen when ducting is not feasible.
- Ceiling Mounted Fans: In addition to range hoods, some kitchens also utilize a standard ceiling exhaust fan to help clear general cooking smells and humidity from the room itself, especially if the range hood is ductless or if cooking generates a lot of steam.
Whole House Fans
These are larger, more powerful fans typically installed in the ceiling of the top floor of a house. They are designed to draw air from open windows throughout the house and expel it through attic vents, effectively cooling the entire house and replacing stale indoor air with fresh outdoor air. They are best used in milder weather when outdoor air is cooler than indoor air.
Inline Fans
These fans are installed within the ductwork itself, meaning they are hidden in ceilings, walls, or attics. They are often quieter and can offer more powerful or flexible ventilation solutions, especially when duct runs are long or complex.
Choosing the right type depends on the room’s use, the intensity of the ventilation needed, and structural considerations in your home.
Installation Basics: What Beginners Need to Know

While complex electrical and ductwork installations are often best left to professionals, many basic exhaust fan replacements or simple installations can be tackled by a confident DIYer. Understanding the fundamental steps will help you appreciate the process and know when to call for help.
Safety First!
Before you begin any work, always turn off the power to the area at your home’s electrical panel. Verify the power is off using a voltage tester. Wear safety glasses and gloves.
Steps for a Basic Replacement (Ceiling Mounted Fan Example):
- Turn Off Power: As mentioned, this is the absolute first step. Go to your breaker box and switch off the circuit breaker that controls the exhaust fan you’re replacing.
- Remove the Old Fan: Carefully remove the fan grille or cover. You’ll likely see screws holding the fan housing to the ceiling joists. Unscrew the fan motor housing from the ductwork and electrical connections. Note how the wiring is connected.
- Inspect Ductwork: Check the existing ductwork for damage, blockages, or loose connections. If it’s in poor condition, you might need to replace it as part of the project. Ensure the duct size matches your new fan’s requirements. A flexible, insulated semi-rigid duct is often recommended for exhaust fans. For guidance on ducting, resources like Energy.gov’s ventilation page offer valuable insights into energy-efficient home ventilation.
- Prepare the New Fan: Read the manufacturer’s instructions for your new fan thoroughly. Some fans require assembly before installation.
- Connect Wiring: Connect the wires from your home’s electrical supply to the new fan’s wiring. Typically, this involves matching colors: black to black (hot), white to white (neutral), and green or bare copper to ground. If you’re unsure about electrical wiring, consult a qualified electrician.
- Mount the New Fan Housing: Secure the new fan housing into the ceiling joists according to the manufacturer’s instructions. Ensure it’s snug and stable.
- Connect Ductwork: Attach the ductwork to the fan’s outlet port. Secure it with a clamp or tape to ensure a tight seal, preventing air leaks.
- Install the Grille/Cover: Attach the new fan grille or cover. This often snaps or screws into place. If it has a light, install the bulb.
- Restore Power and Test: Turn the power back on at the breaker box. Test the fan by flipping the switch. Check for proper airflow and listen for any unusual noises.
For new installations, the process involves cutting a hole in the ceiling, running ductwork through the attic to an exterior vent, and connecting all electrical components. This is significantly more involved and often requires professional assistance, especially for proper sealing and code compliance. Always follow local building codes and manufacturer instructions.
Maintenance for a Healthy System
Just like any appliance, your exhaust fan system needs a little TLC to keep it running efficiently and quietly. Regular maintenance is key to extending its lifespan and ensuring it performs its vital air-clearing job. Most maintenance tasks are simple and don’t require specialized tools.
The main culprits for a struggling exhaust fan are:
- Dust and debris buildup on the fan blades and motor.
- Obstructions in the ductwork.
- Issues with the exterior vent flap.
Here’s a breakdown of essential maintenance tasks:
1. Cleaning the Fan Grille and Blades
This is the most frequent and easiest task. A dirty grille restricts airflow. For fans with removable grilles, carefully detach it (check your model’s manual). Wash it with warm, soapy water, rinse, and dry thoroughly before reattaching. If the grille isn’t removable, or for cleaning the fan blades:
- Turn off power at the breaker.
- Use a vacuum cleaner with a brush attachment to gently remove dust from the grille and any visible blades.
- For accumulated dust: Remove the grille (if possible), spray a damp cloth with a mild cleaner (like diluted dish soap), wipe down the blades, and immediately wipe dry with a clean cloth. Be careful not to get water into the motor.
- Reattach the grille and restore power.
Frequency: Every 3-6 months, or more often if you have pets or notice dust accumulation.
2. Checking and Cleaning Ductwork
Dust and debris can accumulate in the ductwork over time, reducing airflow and potentially becoming a fire hazard. Cleaning the ductwork is a bit more involved.
- Turn off power at the breaker.
- Access the ductwork: This may involve removing the fan grille and reaching into the fan housing with a vacuum attachment, or accessing ductwork through the attic or crawl space.
- Use a vacuum cleaner with a long hose attachment to remove as much loose debris as possible from the duct run.
- Inspect for blockages: Look for sagging ducts, which can collect moisture or debris. Ensure all connections are secure.
- Clean the exterior vent: Detach the exterior vent hood cover (if possible) and clear away any leaves, nests, or debris that might be blocking the flap. Check that the flap moves freely.
Frequency: Annually, or if you notice a significant decrease in airflow.
3. Inspecting the Exterior Vent
The exterior vent hood is the fan’s exit point—a crucial part of the system.
- Check for damage: Ensure no part of the hood is broken, bent, or missing.
- Verify the damper: Locate the flap (backdraft damper) within the vent hood. Ensure it opens freely when the fan is on and closes snugly when the fan is off. Birds or rodents sometimes build nests that block this flap.
- Clear obstructions: Remove any leaves, dirt, or debris that has accumulated around the vent opening.
Frequency: Twice a year, especially after fall and winter.
4. Lubrication (Rarely Needed)
Modern exhaust fan motors are often sealed and do not require lubrication. However, if you have a very old fan and notice squeaking, consult the manufacturer’s manual. If it specifies lubrication, use only the recommended type of oil. If unsure, it’s safer to replace the fan or consult a professional.
Keeping your exhaust fan system clean and clear ensures it works efficiently, improves your home’s air quality, and prevents potential problems down the road.
Troubleshooting Common Exhaust Fan Problems
Even with regular maintenance, you might encounter issues with your exhaust fan system. Don’t panic! Many common problems have simple solutions that you can often fix yourself. When problems arise, the first thing to do is always:
- Check the Power: Ensure the switch is on and the breaker hasn’t tripped.
- Try a Manual Test: If it’s tied to a light, turn the light off and then on to see if the fan activates.
Here are some common issues and how to tackle them:
Problem: The Fan Isn’t Running at All
Possible Causes:
- No power to the fan (tripped breaker, loose wire, faulty switch).
- Motor has failed.
- Loose electrical connection.
Solutions:
- Check the breaker: Reset it if tripped. If it trips again immediately, there’s an electrical issue that needs professional attention.
- Check the switch: If you’re comfortable with basic electrical work, you can test the switch for continuity or simply replace it if it appears faulty. Always ensure power is off.
- Check wiring: Carefully examine the wire connections at the fan housing. Ensure they are secure and not loose or corroded.
- Motor failure: If all else fails and power is confirmed, the motor may be dead. This usually means replacing the entire fan unit.
Problem: The Fan is Running, But There’s No Airflow (or very little)
Possible Causes:
- Blocked ductwork (debris, nests, collapsed duct).
- External vent is blocked.
- Fan blades are dirty or damaged.
- Fan is rotating in the wrong direction (rare for standard fans).
Solutions:
- Inspect and clean ductwork: Follow the maintenance steps above to clear any obstructions.
- Check external vent: Ensure the damper is opening and clear of.
