
Choosing the right toothbrush holder design means prioritizing hygiene, accessibility, and space. Essential features include easy cleaning, adequate ventilation to prevent mold, and a stable base. Consider the number of brushes and any extra items like toothpaste, ensuring a clutter-free and functional bathroom.
When it comes to keeping your bathroom tidy and your toothbrushes hygienic, the humble toothbrush holder plays a surprisingly big role. It’s easy to overlook this small accessory, but a well-designed holder makes a real difference in preventing clutter and keeping your tools clean. If your bathroom counter is a bit of a mess or you’re always wondering where to put your toothbrush, a better holder is the simple solution you need. This guide will walk you through the proven essentials for choosing a toothbrush holder that works for you. We’ll cover everything you need to know to find or even create the perfect spot for your brushes.
Why Toothbrush Holder Design Matters for Your Bathroom

It might seem like a minor detail, but the design of your toothbrush holder significantly impacts your bathroom’s overall functionality and cleanliness. A good holder isn’t just about looking nice; it’s about practical considerations that affect daily life. Think about it: your toothbrush is a tool you use twice a day to maintain your oral health. Keeping it clean and accessible is paramount.
A poorly designed holder can lead to a few common frustrations:
Clutter: Toothbrushes can end up spread across the counter, leading to a messy appearance.
Hygiene Issues: Brushes might touch each other, or sit in stagnant water, creating a breeding ground for germs.
Lack of Space: It can be difficult to fit everything you need near your sink.
Damage: Toothbrushes might fall or get knocked over, potentially damaging the bristles or the holder itself.
This guide is here to simplify the process. We’ll break down the essential elements of toothbrush holder design so you can confidently pick the best option for your needs. Let’s dive into what makes a toothbrush holder truly effective and essential for any bathroom.
The Core Essentials of Toothbrush Holder Design

When selecting a toothbrush holder, focusing on a few key design principles will ensure you get a functional and hygienic solution. These aren’t complicated, but they make all the difference in daily use.
1. Hygiene and Cleanliness
This is arguably the most critical aspect. Your toothbrush is used in your mouth, so keeping it clean is vital for good oral health.
Easy to Clean Materials: Look for non-porous materials like ceramic, stainless steel, or certain plastics that can be wiped down regularly. Wood can be beautiful but may absorb moisture and harbor bacteria more easily if not sealed properly.
Separation for Multiple Brushes: If you have more than one toothbrush, ensure each has its own compartment or slot. This prevents bristles from touching, reducing the spread of germs.
Drainage and Ventilation: This is crucial for preventing mold and mildew. Holders with drainage holes at the bottom or open-top designs allow moisture to escape and air to circulate around the brushes.
A study published in the International Journal of Oral Hygiene highlighted the importance of proper storage for toothbrushes to minimize microbial contamination. This underscores why ventilation and cleaning are not just aesthetic preferences but health necessities.
2. Accessibility and Organization
A toothbrush holder should make your life easier, not harder.
Stable Base: The holder should be heavy enough or have a non-slip base to prevent it from tipping over, especially when bumped or during cleaning.
Appropriate Size: Consider how many toothbrushes you need to store. Some holders are designed for just one, while others can accommodate an entire family’s brushes, electric toothbrush heads, or even razors and toothpaste.
Height and Depth: Brushes should fit comfortably without being too snug or too loose. The depth should be sufficient to keep brushes upright and prevent them from falling out.
3. Material and Durability
The material choice affects both the look and the longevity of your holder.
Water-Resistant Materials: Bathrooms are humid environments. Materials that can withstand moisture without degrading, rusting, or staining are ideal.
Sturdiness: The holder should feel solid and well-made. Avoid flimsy materials that might break easily.
Aesthetics: While function is key, the holder should also complement your bathroom’s decor. Materials range from sleek chrome and polished ceramic to natural bamboo and rustic stone.
4. Space-Saving Design
In smaller bathrooms, every inch counts.
Compact Footprint: Many holders are designed to take up minimal counter space.
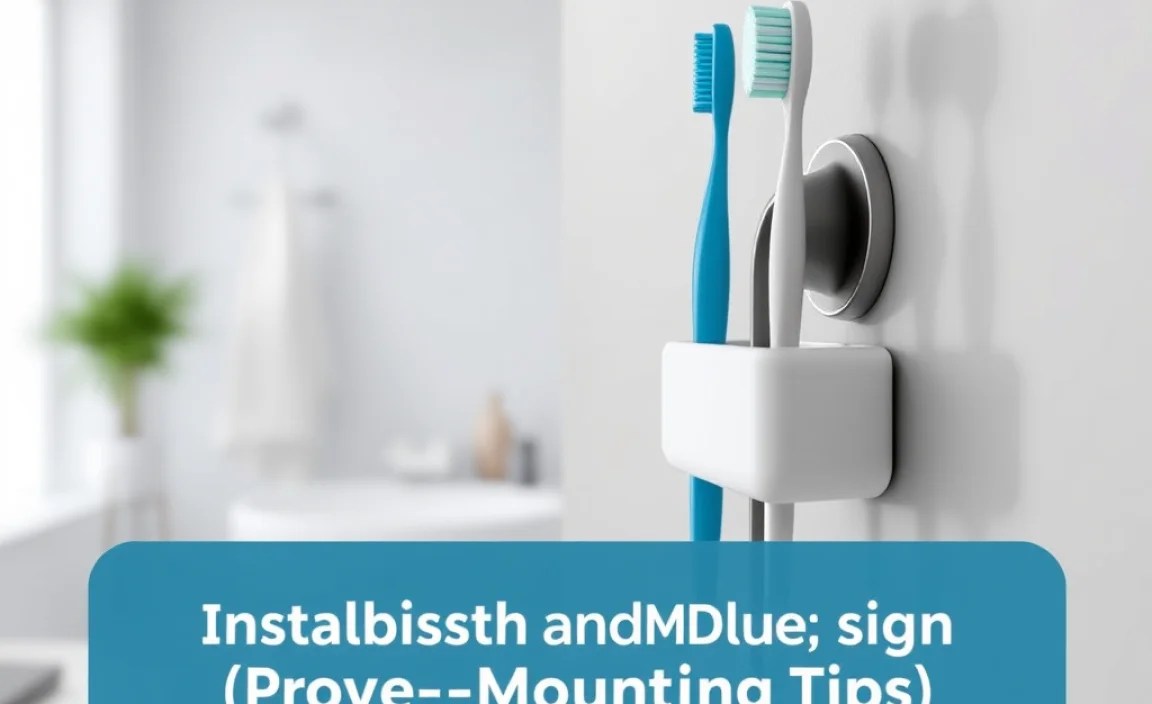
Wall-Mounted Options: For ultimate space-saving, consider wall-mounted holders. These can be mounted next to the sink or inside a medicine cabinet, freeing up valuable counter real estate.
Integrated Solutions: Some holders are part of larger bathroom organizers that also store other toiletries, offering a streamlined approach to bathroom storage.
Types of Toothbrush Holders: A Comparative Look

Understanding the different types of toothbrush holders available can help you pinpoint which design best suits your space and needs. Each type has its own set of advantages and considerations.
Countertop Holders
These are the most traditional and common type. They sit directly on your bathroom counter.
Description: Usually a cup or a caddy with individual slots for toothbrushes.
Pros:
Easy to place and move.
Widely available in countless styles, sizes, and materials.
No installation required.
Cons:
Can take up counter space.
May become a dust collector if not cleaned regularly.
Potential for water pooling at the base if not designed with drainage.
Wall-Mounted Holders
These attach to the wall, often using suction cups, adhesive, or screws.
Description: Can be simple individual caddies that stick to the wall, or more elaborate units with multiple slots and sometimes shelves.
Pros:
Excellent for saving counter space.
Keeps toothbrushes off wet surfaces.
Can be positioned at an ergonomic height.
Cons:
Installation required (though typically very simple).
Suction cups or adhesives may lose their grip over time or on certain surfaces.
Drilling into walls might not be ideal for renters.
Integrated and Multi-Functional Holders
These holders are often part of a larger system or serve multiple purposes.
Description: Can include compartments for toothpaste, floss, razors, or even built-in soap dispensers. Some are designed to sit inside medicine cabinets or drawers.
Pros:
Maximizes organization and minimizes clutter.
Keeps all your oral care essentials together in one place.
Can create a very sleek and unified look.
Cons:
Can be larger and require more space than a simple holder.
May be more expensive due to their complexity.
Less flexibility if your needs change.
Travel Toothbrush Holders
While not for daily bathroom use, these are essential for on-the-go hygiene.
Description: Typically a case or sleeve that encloses the toothbrush.
Pros:
Protects toothbrushes from germs during travel.
Prevents accidental damage to bristles.
Cons:
Not practical for everyday bathroom storage.
Can trap moisture if the brush isn’t dry, potentially leading to odor or mold.
Here’s a table summarizing the key differences:
| Holder Type | Primary Benefit | Potential Drawbacks | Best For |
|---|---|---|---|
| Countertop | Easy access, no installation | Takes counter space, potential for mess | General use, renters, those with ample counter space |
| Wall-Mounted | Space-saving, hygienic surface | Installation required, adhesive/suction issues | Small bathrooms, minimalist aesthetics, those wanting maximum counter space |
| Integrated/Multi-Functional | Ultimate organization, all essentials together | Larger footprint, can be pricier | Families, those who like a highly organized space, maximizing utility |
| Travel | Hygiene and protection on the go | Not for daily use, can trap moisture | Travelers, gym-goers |
Material Deep Dive: What’s Best for Your Holder?

The material of your toothbrush holder impacts its durability, hygiene, and how it looks in your bathroom. Let’s explore some popular options and their characteristics.
Ceramic
Pros: Non-porous, easy to wipe clean, often comes in attractive finishes, feels substantial.
Cons: Can chip or break if dropped, can be heavy.
Best For: A classic, clean look. Good for those who prioritize easy sanitation.
Stainless Steel
Pros: Extremely durable, rust-resistant, easy to sanitize, modern appearance.
Cons: Can show water spots or fingerprints, might be too industrial for some decor styles.
Best For: A sleek, modern bathroom. Excellent for hygiene and long-term durability.
Plastic (High-Quality)
Pros: Lightweight, often affordable, available in many colors and designs, can be molded into various shapes.
Cons: Lower quality plastics can degrade over time, may not look as premium, can scratch, some plastics can be porous.
Best For: Budget-conscious shoppers, vibrant bathroom color schemes, casual styles. Look for BPA-free and durable types.
Bamboo/Wood
Pros: Natural, eco-friendly aesthetic, warm and inviting feel.
Cons: Requires good sealing to resist moisture, can harbor bacteria if not maintained properly, can warp or discolor with prolonged exposure to water.
Best For: Adding a natural touch to bohemian, spa-like, or rustic bathrooms. Needs regular drying and cleaning.
Glass
Pros: Non-porous, very easy to clean, elegant and sophisticated look.
Cons: Fragile, can break if dropped, can show water spots easily.
Best For: Elegant bathrooms where careful handling is a priority.
Silicone
Pros: Flexible, often has suction features for mounting, easy to clean, durable.
Cons: Can sometimes attract lint or dust, some find the aesthetic less premium.
Best For: Modern bathrooms, wet-room styles, or as a flexible component in a larger organizer.
When choosing, consider how much maintenance you’re willing to do. For ultimate ease, non-porous materials like ceramic, stainless steel, or glass are often the simplest to keep clean. For a more natural look, bamboo is an option, but it requires a bit more attention to drying and cleaning.
Installation and Mounting Tips (for Wall-Mounted Holders)
If you’re opting for a wall-mounted toothbrush holder, proper installation ensures it stays put and functions correctly. Here’s a straightforward approach.
Preparation is Key
Before you begin, identify the best location. Ideally, it should be within easy reach of your sink and not directly under a dripping faucet.
Surface Check: Ensure the wall surface is clean, dry, and smooth. If using adhesive strips or suction cups, residue from cleaning products or soap scum can prevent a strong bond.
Marking the Spot: Hold the holder against the wall and use a pencil to lightly mark where the mounting points will go. Use a level if you want it perfectly straight, especially for multi-brush units.
Mounting Methods
The method will depend on the type of holder:
Suction Cups:
1. Clean the wall surface thoroughly and let it dry.
2. Moisten the edge of the suction cup slightly with water or saliva.
3. Press the suction cup firmly against the wall, focusing on pushing out any air bubbles.
4. Some suction cups have a locking mechanism (a lever or click) that you should engage to secure them.
5. Test by gently pulling on the holder.
Adhesive Strips (e.g., Command Strips):
1. Clean the wall with rubbing alcohol and let it dry completely.
2. Apply the adhesive strips to the back of the holder as per the manufacturer’s instructions, usually pressing firmly for 30 seconds.
3. Peel off the backing from the other side of the strip.
4. Press the holder firmly against the wall at your marked location. Hold for the recommended time (often 30 seconds).
5. Wait the recommended curing time (usually 24 hours) before hanging the holder or placing toothbrushes in it. This allows the adhesive to reach its maximum bond strength.
6. Refer to 3M Command’s official guide for best practices with their adhesive products.
Screws (for more permanent fixtures):
1. If your holder comes with screws, often you’ll need to mark the holes, drill pilot holes into the wall (using a drill bit appropriate for your wall type – drywall, tile, etc.), insert wall anchors if needed, and then screw the holder into place.
2. This method is the most secure but leaves permanent holes.
Always follow the specific instructions provided with your toothbrush holder, as mounting hardware and recommendations can vary.
Tips for Maintaining Your Toothbrush Holder
Even the best-designed holder needs a little TLC to keep it working well and looking its best. Regular maintenance is key to hygiene and longevity.
Daily Habits
Rinse and Dry: After use, give your toothbrush holder a quick rinse, especially if there’s any toothpaste residue. Wipe down the exterior if it looks wet or dusty.
Shake Off Excess Water: Ensure toothbrushes are reasonably dry before placing them back in the holder. This reduces moisture buildup.
Weekly Cleaning
Wash Thoroughly: Most countertop holders can be easily washed in the sink with warm, soapy water. For built-in or wall-mounted units, use a damp cloth with soap.
Scrubbing (if needed): If you notice any buildup or stubborn spots, use a soft brush (an old toothbrush works great!) or an abrasive sponge (being careful not to scratch delicate materials) to scrub gently.
Sanitize: For an extra hygienic clean, you can use a mild disinfectant spray or wipe down the holder with a diluted bleach solution (follow product instructions and rinse thoroughly, especially if it’s a material that can be affected by bleach). Ensure good ventilation when using cleaning agents.
According to the Centers for Disease Control and Prevention (CDC), proper cleaning and disinfection practices are essential for maintaining a healthy home environment.
Deep Cleaning and Checks
Check for Mold/Mildew: Regularly inspect drainage holes and crevices for any signs of mold or mildew. If found, clean immediately with a suitable cleaner. For severe cases, consider replacing porous or hard-to-clean items.
Inspect Mounts: For wall-mounted holders, check suction cups or adhesive strips periodically to ensure they are still firmly attached. Re-secure or reapply as needed.
Material-Specific Care
Wood/Bamboo: Wipe dry immediately after washing. Avoid soaking. Consider occasional re-sealing with a food-safe, water-repellent oil if the finish starts to wear down.
Stainless Steel: Use a soft cloth and mild detergent. To remove water spots, a vinegar-based cleaner or specialized stainless steel cleaner can be effective. Always wipe in the direction of the grain if visible.
Ceramic/Glass: These are generally easy to clean. Be cautious about dropping them, as they can chip or break.
By incorporating these simple maintenance routines, you’ll ensure your toothbrush holder remains a hygienic and attractive part of your bathroom for years to come.
Beyond the Basics: Creative Toothbrush Holder Ideas
Once you understand the essential design principles, you can also explore more creative and personalized ways to hold your toothbrushes. These ideas can add personality to your bathroom while still meeting functional needs.
DIY Solutions
You don’t always need to buy a specialized product. Many common items can be repurposed.
Mason Jar with Holes: Drill or punch holes into the lid of a mason jar. The jar itself provides stability, and the lid keeps brushes separate. Ensure the lid material is rust-resistant.
Small Ceramic Pot: A small, decorative ceramic pot or planter can work beautifully. Ensure it has a drainage hole or one that’s easy to clean.
Repurposed Cutlery Holder or Small Vase: A sturdy, narrow vase or a decorative tin bucket can also serve as a toothbrush holder. Look for items with a stable base and open tops.
Unique Wall-Mounted Options
Pegboards: Small pegboards mounted near the sink can accommodate various hooks and small containers for toothbrushes, toothpaste, and other small items.
Floating Shelves with Cups: Install a small floating shelf and place your favorite cups or holders on it, keeping them elevated and organized.
Drawer Organizers
* Drawer Inserts: If you prefer a completely minimalist counter, consider a drawer organizer with divisions specifically sized for toothbrushes. This keeps them hidden and protected.
Consider Electric Toothbrush Heads
If you use electric toothbrushes, remember to account.
