
Grout is the material that fills the spaces between your tiles. Think of it as the unsung hero that holds your beautiful tile work together, preventing dirt and moisture from getting underneath. This guide will demystify grout, explaining what it is, why it matters, and how to identify different types. We’ll cover everything you need to know to confidently tackle DIY tile projects and understand your existing tile installations.
Understanding Grout: Your Beginner’s Roadmap
Ever admired a sparkling tiled backsplash or a perfectly laid bathroom floor and wondered what holds it all together? That’s the magic of grout! If you’re new to home improvement or just curious about the nitty-gritty of tiling, understanding grout is a fantastic starting point. It might sound technical, but at its heart, grout is simply the material that fills the gaps between tiles.
Without grout, your tiles would be loose, susceptible to water damage, and prone to collecting all sorts of grime. It’s the unsung hero that adds durability, stability, and a finished look to any tiled surface. But not all grout is created equal! There are different types, each with its own purpose and benefits. Don’t worry if the terminology sounds intimidating; we’re here to break it all down in simple terms.
This guide is designed for you, the curious DIYer or homeowner. We’ll peel back the layers of grout, explaining its essential role, the different kinds you’ll encounter, and how to spot them. By the end, you’ll feel empowered to identify grout types, understand their properties, and even make informed decisions for your own projects. Let’s dive in and make grout crystal clear!
What Exactly Is Grout and Why Is It So Important?

At its core, grout is a type of cementitious or epoxy mixture used to fill the spaces, or “joints,” between tiles. Imagine laying down a beautiful mosaic; the grout is the substance that seals those tiny gaps, creating a uniform and protected surface.
Its importance can’t be overstated:
- Structural Integrity: Grout helps to lock tiles in place. While the tiles themselves are adhered to the substrate (like drywall or concrete), grout provides lateral support and prevents individual tiles from shifting over time. This is especially crucial in areas with a lot of foot traffic or vibration.
- Moisture Barrier: One of the biggest enemies of tile installations is moisture. Water can seep into the substrate behind the tiles, leading to mold, mildew, rot, and structural damage. Grout acts as a crucial barrier, preventing this water intrusion. This is why properly grouted bathrooms and kitchens are so vital for home health.
- Aesthetic Appeal: Grout isn’t just functional; it plays a massive role in the overall look of a tiled area. The color and width of grout lines can dramatically change the visual impact of the tiles. A contrasting grout can make tiles pop, while a matching grout can create a seamless, sophisticated look.
- Protection Against Debris: Beyond water, grout prevents dirt, dust, and other debris from accumulating in the tile joints. This makes cleaning and maintenance much easier.
Think about it – without grout, your tiles would be like a puzzle with all the pieces slightly ajar. It’s the glue that binds the aesthetic and the functional aspects of your tile work.
The Different Flavors of Grout: A Beginner’s Guide

When you start looking at tile projects or considering a DIY installation, you’ll quickly realize there isn’t just one kind of grout. Understanding the basic types is key to choosing the right product for your needs. For beginners, we’ll focus on the three most common categories:
1. Cementitious Grout
This is the most traditional and widely used type of grout. It’s primarily made from Portland cement, along with fillers and additives. Think of it as a specialized, fine-grained mortar.
Cementitious grouts are further divided into two main sub-categories:
a. Sanded Grout
Sanded grout is exactly what it sounds like: cement mixed with fine sand. The sand acts as a filler and prevents shrinkage and cracking as the grout dries.
- Best Use: As a general rule of thumb, sanded grout is recommended for grout lines that are 1/8 inch wide or larger. The sand particles add strength and stability to wider joints.
- Pros:
- Economical
- Easy to work with for beginners
- Strong and durable for wider joints
- Less prone to shrinking/cracking in wider gaps
- Cons:
- Can be harder to clean from tile surfaces due to the sand
- Not suitable for very narrow grout lines (the sand particles won’t fit)
- Can be porous and prone to staining if not sealed
b. Unsanded Grout
This type of grout is a finer cement mixture without the addition of sand. It’s smoother and more fluid than sanded grout.
- Best Use: Unsanded grout is ideal for very narrow grout lines, typically less than 1/8 inch wide. It’s also the go-to for tiles with delicate or absorbent surfaces, like polished marble or glass, as the sand in sanded grout could scratch them.
- Pros:
- Smooth finish
- Easy to clean from delicate tile surfaces
- Ideal for tight grout lines
- Cons:
- Can shrink and crack in wider grout lines
- May not be as structurally strong as sanded grout for very wide gaps
- Can be more prone to staining if not sealed
2. Epoxy Grout
Epoxy grout is a more advanced option made from epoxy resins and a hardener. It’s a two-part system that chemically cures rather than air-drying like cementitious grout.
- Best Use: Epoxy grout is highly recommended for areas that experience heavy traffic, moisture, and potential staining, such as kitchen countertops, bathroom floors, shower stalls, and commercial applications. It’s also excellent for use with mosaics and small tiles where very narrow grout lines might otherwise be problematic for cementitious grout.
- Pros:
- Extremely durable and strong
- Highly resistant to stains, chemicals, and water
- Non-porous, meaning it doesn’t require sealing
- Resists cracking and shrinking
- Available in a wide range of colors, including metallic and translucent options
- Cons:
- More expensive than cementitious grout
- Can be more difficult to work with; it has a shorter working time (pot life) and requires careful mixing
- Clean-up must be done promptly and precisely
- Can be harder to remove if you ever decide to change your tile
For beginners, cementitious grouts (sanded or unsanded depending on joint width) are generally the most forgiving. Epoxy grout is fantastic but does have a steeper learning curve and often commands a higher cost.
3. Furan Grout
Furan grout is another type of epoxy-based grout but is known for its exceptional chemical resistance, even more so than standard epoxy grout. It’s a liquid resin system that is catalyzed before application.
- Best Use: Typically used in industrial or laboratory settings where exposure to harsh chemicals, extreme temperatures, and heavy traffic is common. Think of commercial kitchens, food processing plants, or manufacturing facilities.
- Pros:
- Unmatched resistance to acids, alkalis, and solvents
- Extremely durable and long-lasting
- Can withstand very high temperatures
- Cons:
- Very difficult and messy to apply; requires professional installation
- Expensive
- Limited color options
- Not suitable for typical residential applications
For most homeowners and DIYers, furan grout is overkill and not something you’ll likely encounter or need. Cementitious and epoxy grouts cover the vast majority of residential tiling needs.
Factors to Consider When Choosing Grout

Deciding on the right grout involves more than just picking a color. Here are some key factors that influence your decision:
1. Grout Joint Width
This is often the most critical factor for beginners when selecting between sanded and unsanded cementitious grout.
- Narrow Joints (less than 1/8 inch): Use unsanded grout. Sanded grout particles are too large and won’t fit, potentially causing it to crumble or not set properly.
- Wide Joints (1/8 inch or more): Use sanded grout. The sand provides the necessary bulk and prevents shrinkage and cracking in these larger gaps.
- Very Wide Joints (1/2 inch or more): While less common for typical wall and floor tiles, these might require specialized methods or additives to ensure durability.
2. Tile Type and Surface
Some tiles are more delicate than others.
- Delicate/Soft Tiles (e.g., polished marble, travertine, glass, metal): Always opt for unsanded grout or epoxy grout. The abrasive nature of the sand in sanded grout can scratch or damage these surfaces.
- Harder Tiles (e.g., porcelain, ceramic, natural stone like granite): Can generally use sanded grout (for wider joints) or unsanded grout (for narrower joints).
3. Location and Use
Where will the tile be installed? This dramatically impacts durability and resistance needs.
- High-Traffic Areas (e.g., kitchen floors, entryway floors): Epoxy grout or high-performance sanded cementitious grouts are best. They resist wear and tear better.
- Wet Areas (e.g., showers, tub surrounds, backsplashes): Epoxy grout excels here due to its superior water and stain resistance. If using cementitious grout, ensure it’s properly sealed.
- Areas Prone to Stains (e.g., kitchen counters, backsplashes): Epoxy grout is the champion due to its non-porous nature.
- Areas with Chemical Exposure: Furan grout is the top choice, but epoxy is sufficient for most residential needs.
4. Maintenance and Sealing
All cementitious grouts are porous to some degree. This means they can absorb spills and stains, leading to discoloration over time. Epoxy grout, being non-porous, does not require sealing.
- Cementitious Grout: Requires sealing after it cures and periodically thereafter (typically every 1-3 years, depending on the sealer and traffic). A good quality grout sealer can significantly improve stain and moisture resistance.
- Epoxy Grout: No sealing required, making it a lower-maintenance option in the long run, despite the initial effort to install.
You can find more information on grout and tiling best practices from the Ceramic Tile and Stone Association (CTSA), a reputable resource for tile industry standards.
5. Aesthetics and Color
Grout color can dramatically alter the look of your tiles. Think about the mood you want to create.
- Contrast: Dark grout with light tiles (or vice-versa) can accentuate the tile shape and pattern.
- Harmony: Grout that closely matches the tile color can create a subtle, continuous look.
- Neutral: Gray, beige, or white grouts are versatile and work with many tile styles.
Modern grout colors are abundant, from traditional neutrals to vibrant hues and even metallics, especially with epoxy options. Always check a color chart in good lighting!
How to Identify Your Grout Type (For Old Installations)
So, how do you figure out what kind of grout you have on an existing tile job? Here are a few clues and simple tests:
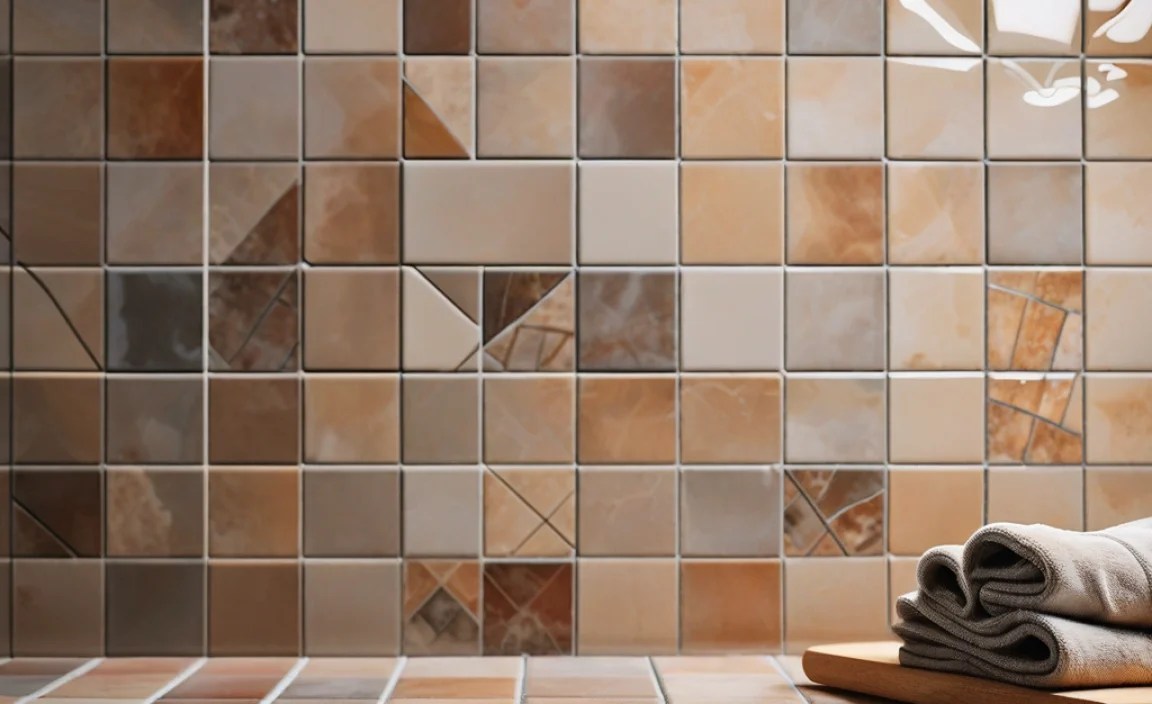
Visual Inspection
Start by looking closely at the grout lines:
- Texture: Does it look gritty or sandy? This is a strong indicator of sanded cementitious grout. If it looks very smooth and almost plastic-like, it could be unsanded cementitious or epoxy.
- Width: Are the grout lines very narrow (e.g., 1/16 to 1/8 inch)? It’s likely unsanded cementitious or a precision epoxy. Wider lines (1/8 inch or more) are typically sanded cementitious.
- Color Consistency: Is the color uniform everywhere, or are there areas that look different or more stained? Cementitious grouts are more prone to staining and discoloration than epoxy.
The Scratch Test (Use Caution!)
This is a more hands-on test. You’ll need a small, sharp, non-metallic object, like a plastic scraper or the edge of a plastic putty knife (avoid using metal screwdrivers or knives directly on delicate tiles).
- Gently Scrape: In an inconspicuous area (like a corner or behind an appliance), try to gently scrape a small amount of the grout.
- Observe Debris:
- Sanded Grout: You’ll likely see fine sand particles mixed with the cement dust.
- Unsanded Grout: You’ll see a finer, powdery cement dust with no gritty particles.
- Epoxy Grout: It’s much harder to scrape. You won’t get much dust; instead, you might chip away small pieces, and it will feel very hard and dense. If you try to scrape it and it doesn’t yield dust easily, it’s probably epoxy.
Always test in a hidden spot and be gentle to avoid damaging your tiles or fixtures.
The Water Absorption Test (for Cementitious vs. Epoxy)
This test differentiates between porous cementitious grout and non-porous epoxy grout.
- Clean and Dry: Ensure a small section of the grout is clean and completely dry.
- Water Droplets: Place a few drops of water directly onto the grout line.
- Observe:
- Cementitious Grout: The water will likely soak into the grout, darkening the color in that spot. You might see it wick into the grout line.
- Epoxy Grout: The water will bead up on the surface and will not soak in. It will remain looking like it’s sitting on top of a plastic film.
This test is particularly useful for distinguishing epoxy from cementitious grout. You can find detailed guides on grout types and maintenance on resources like HouseLogic.
Grout Application Basics (For Beginners)
If you’re the type who likes to get hands-on, understanding the basic application process for cementitious grout will demystify your next DIY tiling project. Remember, practice makes perfect, and starting with a smaller, less visible area is always a good idea!
What You’ll Need:
- Your Chosen Grout: (Sanded or Unsanded, Sanded is most common for beginners)
- Grout Float: A specialized rubber-faced tool for spreading grout.
- Grout Sponge: Dense and absorbent, used for cleaning excess grout.
- Two Buckets: One for mixing grout, one for rinse water.
- Mixing Stick or Drill with Mixer Attachment: For achieving the right consistency.
- Gloves: Grout can irritate skin.
- Safety Glasses: Protect your eyes.
- Clean Cloths or Microfiber Towels: For final buffing.
Step-by-Step Grouting (Cementitious Type)
Step 1: Prepare the Grout Mix
Follow the manufacturer’s instructions precisely. Typically, you’ll add grout powder to water in a clean bucket. Mix it to a peanut butter or toothpaste-like consistency. Too wet, and it will be weak; too dry, and it will be difficult to spread and won’t fill the joints properly. Let it “slake” (sit and absorb water) for a few minutes as per instructions, then mix again.
Step 2: Apply the Grout
Using your grout float, scoop up a generous amount of grout. Hold the float at a 45-degree angle to the tiles and spread the grout over the surface, pressing firmly to push it deep into the joints. Work in small sections. Move the float diagonally across the tiles to ensure all gaps are filled.
Step 3: Remove Excess Grout
Once the joints are filled in a section, hold the float
