
Quick Wooden Summary: Understanding the essential design and layout of shower plumbing is key for a leak-free, efficient, and comfortable bathroom. This involves planning pipe placement, drain location, and fixture height for optimal water flow and drainage, ensuring a durable and functional shower for years to come.
You know that feeling – stepping into a shower that’s just… off. Maybe the water pressure is weak, or worse, you spot a tiny damp patch on the ceiling downstairs. Plumbing layouts can seem like a big mystery, but when it comes to your shower, getting it right from the start makes all the difference. A well-planned shower plumbing layout ensures water goes where it’s supposed to, drains efficiently, and keeps your bathroom dry and safe. Don’t let plumbing terms intimidate you; we’re going to break down exactly what you need to know in simple terms. Let’s make your shower a dream, not a drip!
Why Shower Plumbing Layout Matters

When you’re building a new bathroom or renovating an old one, the layout of your shower plumbing is one of those foundational decisions that can significantly impact how your bathroom functions and how long it lasts. It’s not just about where the pipes go; it’s about creating a system that works harmoniously. A poorly designed layout can lead to a host of frustrating problems, from inefficient water pressure and uneven temperature control to water damage and mold growth. Think of it like planning a highway; you need clear routes for water to flow in and waste to flow out smoothly.
Common Plumbing Layout Challenges
Water Pressure Issues: If pipes are too narrow, too long, or have too many bends, you might experience low water pressure. This is especially noticeable if multiple fixtures are running at once.
Drainage Problems: An improperly sloped shower floor or drain pipe can cause water to pool, leading to slow draining, potential clogs, and unsanitary conditions.
Temperature Fluctuations: If hot and cold water lines aren’t balanced correctly, you might get sudden blasts of cold or scalding water when someone else uses a different fixture.
Leaks and Water Damage: This is the big one. Incorrect pipe connections, improper sealing, or inadequate ventilation in the plumbing system can lead to leaks that seep into walls and ceilings, causing costly damage and mold.
Accessibility Concerns: The height of shower controls, showerheads, and the overall shower entry are crucial for ease of use, especially for individuals with mobility challenges.
Getting the layout right from the outset prevents these headaches. It’s about smart design and following best practices. We’ll guide you through the essentials.
Understanding the Core Components of Shower Plumbing

Before we dive into the layout itself, it’s helpful to know the main players involved in your shower’s plumbing system.
The Water Supply Lines
These bring hot and cold water to your shower.
Cold Water Supply: This line brings fresh, cold water directly from your main water source or water heater.
Hot Water Supply: This line brings heated water, usually from a water heater, to your shower mixer.
Supply Riser: This is the vertical pipe that brings water up from your main plumbing lines to the shower valve.
The Shower Valve (Mixer)
This is the heart of your shower’s control system. It’s where the hot and cold water meet and are mixed to your desired temperature. The shower valve also controls the flow of water and switches between different shower functions (like a showerhead and body jets).
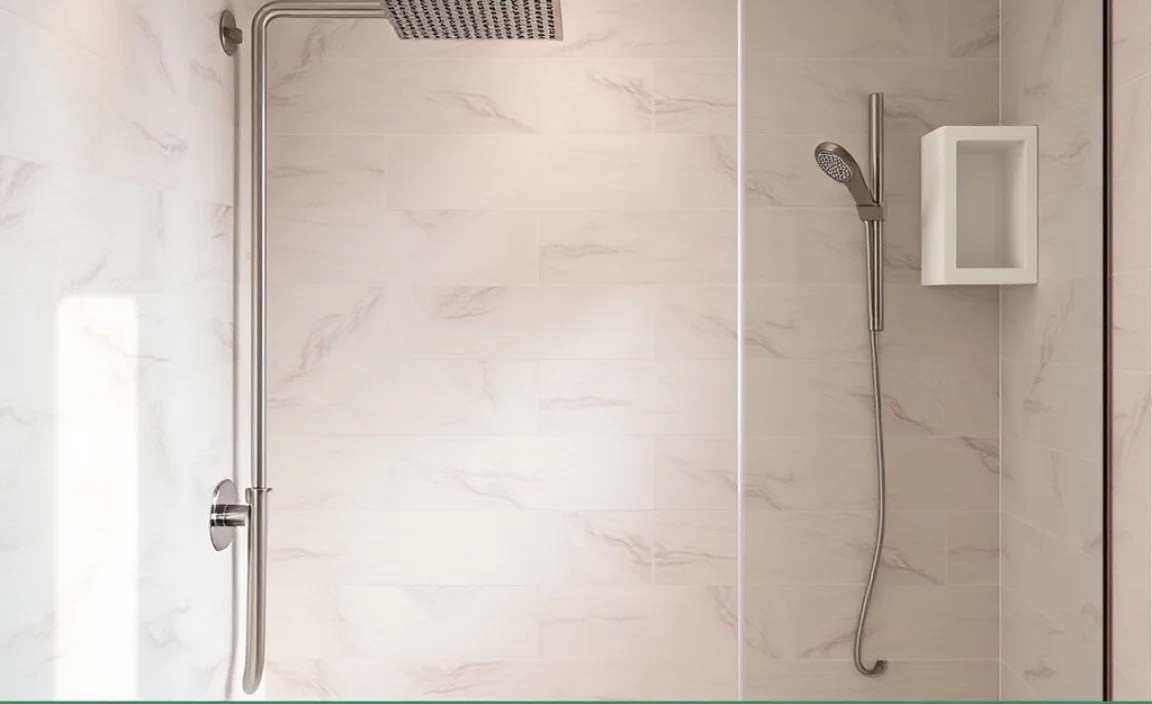
The Shower Head(s) and Diverters
Fixed Shower Head: The traditional showerhead typically mounted at the end of a horizontal pipe.
Handheld Shower Head: A flexible hose allows for easier rinsing and accessibility.
Body Jets/Sprays: Small jets installed in the shower walls for a spa-like experience.
Diverter: A mechanism (often part of the shower valve) that directs water flow to different outlets, like from the tub spout to the showerhead, or between a main showerhead and a handheld one.
The Drainage System
This is what gets rid of the used water.
Drain Flange: This is the visible grate in your shower floor that catches debris.
Drain Body/Trap: Located beneath the shower floor, this component includes a trap (often a P-trap) that holds water to prevent sewer gases from coming up into your bathroom.
Waste and Vent Pipes: These connect the drain body to your home’s main sewer line and the plumbing vent system. The vent system is crucial for allowing air into the pipes, which helps water drain freely. Without proper venting, you can get gurgling sounds and slow draining.
Essential Design Principles for Shower Plumbing Layout

Now, let’s talk about how these components come together. The layout is all about positioning and connections to ensure everything works safely and efficiently.
1. Strategic Placement of the Shower Valve
The shower valve is arguably the most critical component to place correctly.
Accessibility for Maintenance: While most valves control water from the front, there are often behind-the-wall connections that might need future access. Consider future maintenance when placing the valve.
Proximity to Supply Lines: The closer the valve is to your hot and cold water supply risers, the shorter and simpler your plumbing runs will be, minimizing potential pressure drops.
Height: Standard heights for shower valves typically place the handle between 33 and 48 inches from the finished floor. This ensures comfortable use for most adults. For universal design or accessibility, you might adjust this.
Mounting: The valve must be securely mounted to a solid backing within the wall cavity, often using a specialized mounting bracket. This prevents the valve from shifting or stressing the pipe connections.
2. Optimizing the Drainage Layout
This is where many beginner DIYers run into trouble. Proper drainage is non-negotiable for preventing water damage.
Shower Floor Slope: The most critical factor! The shower floor must slope towards the drain. The National Kitchen & Bath Association (NKBA) recommends a slope of at least 1/4 inch per foot for the first 2 feet of the shower floor. This ensures water flows away quickly.
Drain Location: While centered drains are common, they aren’t always the best. Placing the drain near the shower door or bench can sometimes simplify the subfloor work and slope requirements, especially in larger showers.
Pipe Size and Slope: The drain pipes carrying water away from the shower must also be sloped correctly. For most residential plumbing, a 1/4 inch per foot slope is standard for waste lines. This ensures gravity does its job efficiently. The size of the drainpipe (typically 1.5 or 2 inches for a shower) is also important; undersized pipes can lead to clogs.
Ventilation: The drain line needs to be connected to your home’s vent system. This allows air to enter the drain pipe, preventing a vacuum from forming and enabling smooth water flow. You can learn more about plumbing vent systems from resources like This Old House, a trusted authority on home improvement.
3. Supply Line Routing and Connections
Simple, direct routing is best for supply lines.
Minimize Bends: Every bend in a pipe can slightly reduce water pressure. Plan your routes to be as straight as possible.
Proper Support: Pipes within walls need to be supported by hangers or straps to prevent movement and stress on connections.
Material Choice: Common materials for supply lines include PEX tubing (flexible and easy to work with), copper, and CPVC. Ensure your chosen material is rated for hot and cold potable water.
Rough-in Valves: Most shower valves are installed as “rough-in valves” before the walls are closed up. This is the valve body that connects to the hot and cold supply lines and the shower arm. The trim kit (handle, escutcheon plate) is installed later.
4. Shower Head and Arm Placement
This seems simple, but it affects your shower experience.
Height: Standard showerheads are typically installed 72 to 84 inches from the floor. This provides ample headroom for most people. Adjustable or rain showerheads might have different placement considerations.
Distance from Wall: The shower arm should extend far enough from the wall so the water stream hits you in the showering area, not your back. A typical extension is about 18 inches, but this varies with arm style and desired coverage.
Water Supply to Head: The shower arm screws into a shower supply elbow fitting that is connected to the pipe coming from the shower valve. Ensure this connection is watertight.
Planning for Different Shower Types
The basic principles hold true, but the layout can get more complex for custom showers.
Tub/Shower Combinations
Diverter Valve: You’ll need a valve with a diverter to switch water flow between the tub spout and the showerhead.
Tub Spout Height: The tub spout is typically installed 6-8 inches above the overflow drain.
Shower Height: The showerhead height is set as described above.
Walk-in Showers
Drain Placement: Often requires more planning due to larger floor areas and potentially no curb. A linear drain running along one wall can be a good option for draining larger spaces.
Multiple Heads/Body Jets: If you plan for multiple showerheads or body jets, ensure your water supply lines can handle the increased demand and that the shower valve is designed to control multiple outlets.
Custom Shower Designs (e.g., Steam Showers, Multiple Heads)
Increased Water Demand: Steam generators and multiple shower heads require a robust water supply. You might need larger supply pipes or have your system checked by a professional.
Valve Complexity: More complex systems require specialized valves that can manage multiple outlets and potentially steam controls.
Specialized Vents: Steam showers, in particular, have specific ventilation requirements to manage moisture effectively.
Tools and Materials You Might Encounter

As a DIYer, knowing your tools helps visualize the process.
Essential Tools for Shower Plumbing Layout:
Pipe Wrench: For gripping and turning pipes.
Adjustable Wrenches: Versatile for various nuts and fittings.
Tubing Cutter: For making clean cuts on copper or PEX tubing.
Deburring Tool: To smooth the edges of cut pipes for a better seal.
Pliers (e.g., Channel Locks): For gripping and manipulating fittings.
Tape Measure: For accurate measurements.
Level: To ensure proper slopes and placements.
Drill and Bits: For creating holes in studs for pipe runs.
Soldering Torch and Solder (for copper): If using copper pipes.
PEX Crimp Tool or Expansion Tool (for PEX): Depending on the type of PEX fitting used.
Caulking Gun: For sealing.
Common Plumbing Materials:
Shower Valve: The rough-in valve body.
Supply Pipes (PEX, Copper, CPVC): For hot and cold water.
Drain Pipes (ABS or PVC): For waste water.
Fittings: Elbows, couplings, adapters to connect pipes.
Thread Seal Tape (Teflon Tape) and Pipe Dope: For sealing threaded connections.
Primer and Cement (for ABS/PVC): For solvent-welding plastic pipes.
Shower Drain Assembly: Including the flange and trap.
Shower Arm and Flange.
Mounting Brackets and Straps.
Waterproofing Membrane: For the shower walls and floor.
For a comprehensive list of tools, many plumbing supply stores and online DIY resources like The Home Depot’s plumbing tool section offer great visual guides.
Step-by-Step: Designing Your Shower Plumbing Layout (Conceptual)
While a full installation involves many detailed steps, here’s a conceptual overview of the layout design process.
Step 1: Determine Shower Location and Fixtures
Decide on the exact placement of your shower, considering existing plumbing points if possible to reduce work.
Choose your fixtures: standard showerhead, handheld, body jets, tub spout, etc. This dictate the type of valve and number of supply lines needed.
Step 2: Map Out the Drain Path
Identify the location of your shower drain.
Sketch the route for the drainpipe from the shower drain to the main waste pipe, ensuring you maintain the required 1/4 inch per foot slope.
Ensure this route connects to an existing vent or allows for a new vent to be installed.
Step 3: Plan the Water Supply Lines
Locate where your hot and cold water risers will come from.
Map the shortest, most direct path for the hot and cold supply lines to the shower valve location.
Consider the placement of future shut-off valves for easier maintenance.
Step 4: Position the Shower Valve
Determine the valve’s height and central location relative to the intended showerhead(s) and any controls.
Ensure it can be securely mounted within the wall.
Step 5: Layout Shower Arm and Head Placement
Determine the desired height and extension of your shower arm and head for comfortable use.
Confirm the pipe leading to the shower arm from the valve is correctly routed and supported.
Step 6: Consider Ventilation Requirements
Confirm your plan integrates with your home’s plumbing vent system to allow for proper drainage and prevent sewer gas.
Step 7: Rough-In and Testing
Once the pipes are run and connected (this is the “rough-in” phase before walls are closed), the system should be pressure-tested for leaks. This is a critical step often done by licensed plumbers before insulation and drywall are installed.
This conceptual outline emphasizes the planning. Actual installation involves detailed measurements and connection methods specific to your chosen materials.
Common Layout Mistakes to Avoid
Even with the best intentions, some common mistakes can lead to problems down the line.
1. Insufficient Shower Floor Slope
Mistake: Not creating a steep enough slope (less than 1/4″ per foot) towards the drain.
Consequence: Standing water, slow drainage, potential water damage. Always check and re-check your slope before waterproofing and tiling!
2. Inadequate Venting
Mistake: Not connecting the drain line to a vent stack, or having blocked vents.
Consequence: Slow draining, gurgling sounds, sewer gas odors. Proper venting is a code requirement and essential for function.
3. Over-Reliance on Horizontal Pipe Runs for Drains
Mistake: Assuming a level drain pipe will work. Gravity needs a downward slope.
Consequence: Clogs and backups as solids settle in horizontal sections.
4. Incorrect Valve Placement for Future Access
Mistake: Burying the valve body so deep or in such an inaccessible spot that repairs are impossible without major demolition.
Consequence: Extremely costly and disruptive repairs if the valve ever leaks or fails.
5. Ignoring Manufacturer Instructions
Mistake: Not following the specific installation guidelines for the shower valve, drain, or any specialized fixtures.
Consequence: May void warranties and lead to improper function or premature failure.
6. Using Wrong Materials
Mistake: Using materials not rated for potable hot and cold water, or for drain/waste/vent applications.
* Consequence: Leaks, pipe degradation, potential health hazards. Always check product specifications and local building codes. Resources like the International Code Council (ICC) provide building code information that dictates material usage.
Frequently Asked Questions (FAQ)
Here are some common questions beginner DIYers have about shower plumbing layout.
Q1: How much slope does a shower floor need?
A1: The standard recommendation is a slope of at least 1/4 inch per foot for every foot of floor area leading to the drain. This ensures water moves away quickly and prevents pooling.
Q2: What is the standard height for a shower valve handle?
A2: Typically, the shower valve handle is placed between 33 inches and 48 inches from the finished floor, making it accessible for most adults. However, this can be adjusted for specific needs or preferences.
Q3: Can I run my shower drain pipe horizontally?
A3: No, all drain, waste, and vent (DWV) pipes must have a downward slope to allow gravity to move waste and water. A standard slope is 1/4 inch per foot. Horizontal runs will cause clogs.
Q4: What are the main types of shower valves?
A4: The most common are pressure-balancing valves (which maintain a set temperature by balancing hot and cold pressure) and thermostatic valves (which maintain a precise temperature set point, often more luxurious and expensive). For a tub/shower combo, you’ll also need a diverter.
Q5: Do I need to vent my shower drain?
A5: Absolutely yes. Every drain in your home needs to be vented to allow air into the system. This prevents vacuums from forming, which would cause water to siphon out of traps and allow sewer gases into your home.
