
Mastering how to remove caulking easy is straightforward with the right tools and a simple step-by-step process. This guide will show you how to quickly and cleanly tackle old caulk, preparing your surfaces for a fresh seal without the frustration.
Dealing with old, damaged, or moldy caulk can be a real pain. You might have noticed it peeling, cracking, or just looking plain unsightly around your bathroom, kitchen, or windows. It might seem like a daunting task, but you can absolutely remove old caulking with confidence. Even if you’re new to DIY projects, this guide will walk you through the process, making it surprisingly easy. We’ll show you exactly what you need and how to do it, step-by-step, so you can get that fresh, clean finish you’re looking for.
Why Removing Old Caulk Matters

Before we dive into the “how-to,” let’s quickly touch on why this is such an important maintenance task. Old caulk isn’t just an eyesore; it can lead to bigger problems. When caulk loses its seal, it can allow water to seep behind tiles, under sinks, or around windows. This moisture can cause:
- Mold and Mildew Growth: Damp areas are breeding grounds for mold and mildew, which can be harmful to your health and damage your home.
- Water Damage: Persistent leaks can warp wood, damage drywall, and even compromise structural integrity over time.
- Pest Infestations: Gaps created by failing caulk can become entry points for insects and other small pests.
- Drafts and Energy Loss: Around windows and doors, old caulk lets out heated or cooled air, making your home less energy-efficient.
So, a clean caulk removal is the first, crucial step in resealing and protecting your home, ensuring a watertight and healthy environment. It’s a foundational task that makes a big difference.
Gathering Your Essential Tools
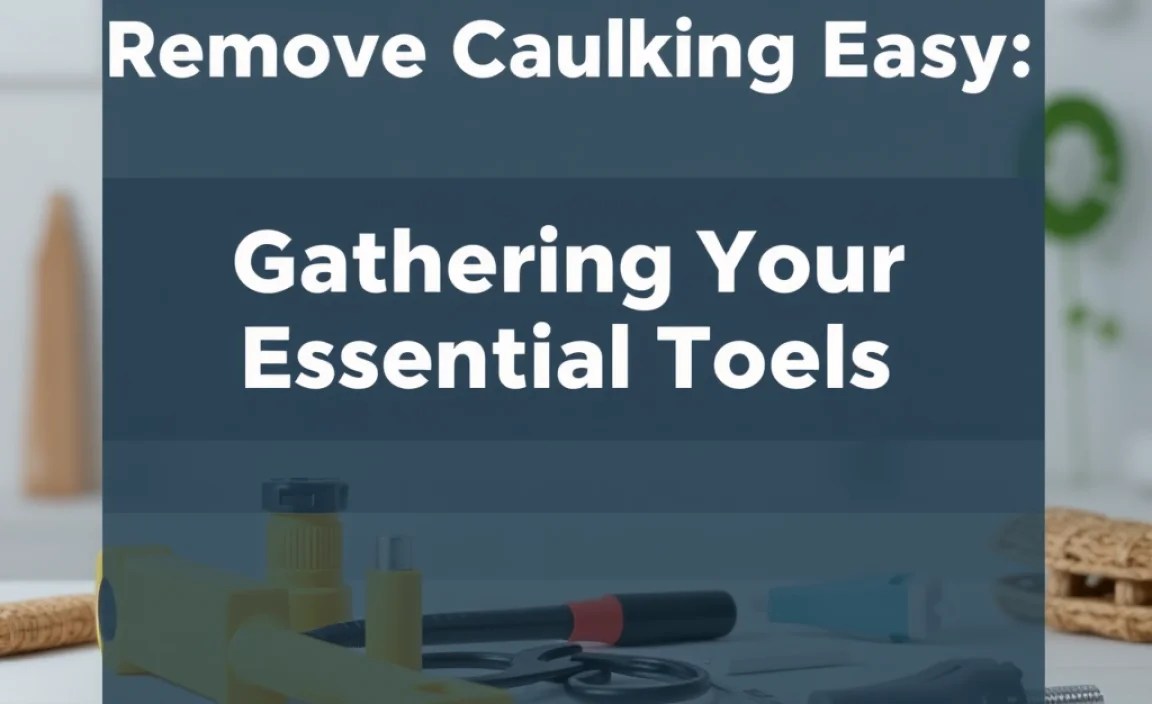
The good news is you don’t need a workshop full of fancy gadgets to remove caulking. Most of what you’ll need is probably already in your home or is inexpensive to pick up. Having the right tools makes the job faster, cleaner, and much easier. Here’s what we recommend:
The Must-Have Toolkit
- Utility Knife or Putty Knife: This is your primary tool for scoring and prying. A sharp utility knife with a fresh blade is excellent for cutting through tough caulk. A flexible putty knife can also work well for scraping.
- Caulk Removal Tool: These are specialized plastic tools designed with various angles and edges specifically for cutting, scraping, and cleaning out caulk. They are often very affordable and can save you from scratching surfaces.
- Scraper: A flat scraper or even an old credit card can be useful for removing soft residue after the bulk of the caulk is gone.
- Gloves: Protect your hands! Caulk can be sticky and sometimes contain chemicals.
- Safety Glasses: Always important to protect your eyes from flying debris or errant blades.
- Trash Bags or Bucket: For easy cleanup of the removed caulk.
- Cleaning Supplies: Rags, sponges, and a mild cleaner (like soapy water or a bathroom cleaner) will be needed for the final cleanup.
- Optional: Heat Gun or Hair Dryer: For very stubborn caulk, a little heat can soften it, making it easier to remove. Be cautious not to overheat surfaces.
- Optional: Caulk Softener/Remover Solution: Commercial products can help break down tough caulk, but they often require extra ventilation and careful application. We’ll stick to mechanical removal first.
Having these items ready before you start will make the process smooth sailing. Think of it like preparing your ingredients before cooking – it makes the whole experience better!
Step-by-Step: How to Remove Caulking Easy

Now for the main event! Follow these steps to remove that old caulk cleanly and efficiently. We’ll break it down so it’s easy to understand and follow.
Step 1: Prepare the Area
Before you grab any tools, take a moment to prepare your workspace. This makes cleanup much simpler and protects surrounding areas.
- Clear the Space: Remove any items from countertops, shelves, or floors near where you’ll be working.
- Protect Surfaces: If you’re worried about scratching delicate surfaces (like painted walls or countertops), you can lay down painter’s tape along the edges where the caulk meets the material. This isn’t always necessary but can provide extra protection.
- Ventilate: Open a window or turn on a fan, especially if you plan to use any chemical removers or if the old caulk has a strong odor.
Step 2: Score the Caulk
The goal here is to break the seal between the caulk and the surface it’s attached to. This is where your utility knife or a specialized caulk removal tool comes in handy.
- Angle Your Blade: Hold your utility knife or the scoring edge of your caulk tool at an angle.
- Cut Along the Edges: Make a shallow cut along both sides of the caulk bead. You want to score the caulk where it meets the fixture (like a tub or sink) and where it meets the wall or tile. Don’t try to cut deeply; just enough to break the bond.
- Multiple Passes: You might need to make a few passes to ensure you’ve scored it sufficiently on both sides.
This scoring helps loosen the caulk and gives you a place to insert your prying tool.
Step 3: Pry and Peel Away the Caulk
With the caulk scored, it’s time to start removing it. This is often the most satisfying part!
- Insert Your Tool: Use the edge of your putty knife, caulk removal tool, or even the tip of your utility knife (carefully!) to get under the scored caulk.
- Work in Sections: Gently pry up the caulk. Try to get under the entire bead and pull it away. If it’s resisting, go back to step 2 and score again.
- Peel or Scrape: Once a section is lifted, you can often peel the entire bead away, much like peeling a sticker. If it breaks into smaller pieces, use your scraper to lift them.
- Use a Heat Source (If Needed): For very old or stubborn caulk, a few seconds of low heat from a hairdryer or heat gun can soften it, making it much easier to peel. Hold the heat source a few inches away and move it constantly to avoid damaging the surface. The U.S. Department of Energy provides great tips on how sealing gaps (which starts with removing old caulk!) can improve home energy efficiency.
Take your time. Rushing can lead to nicks and scratches on your surfaces. Patience is key for a clean finish.
Step 4: Scrape Away Residue
Even after peeling, you’ll likely have some stubborn bits of caulk left behind. This is where your scraper or putty knife is invaluable.
- Use a Flat Edge: Hold your scraper or putty knife nearly flat against the surface.
- Scrape Gently: Work in short, firm strokes to scrape away any remaining caulk. The goal is to remove the residue without gouging or scratching the underlying material.
- Use a Caulk Removal Tool’s Edges: Many caulk removal tools have specific scraping or V-shaped edges designed to get into corners and remove thin beads of residue effectively.
- Credit Card Trick: For very soft residue, an old credit card can be a surprisingly effective, non-scratching scraper.
For really tough spots, a little bit of rubbing alcohol or even mineral spirits (used according to product instructions and with good ventilation) can sometimes help dissolve the last traces of caulk residue. Always test in an inconspicuous area first.
Step 5: Clean the Area Thoroughly
Once all the caulk and residue are removed, it’s time for a good cleaning. This ensures the new caulk will adhere properly.
- Wipe Down: Use a damp rag or sponge to wipe away any dust or debris.
- Wash: Prepare a solution of warm water and a small amount of mild dish soap. Scrub the area gently with a sponge or cloth. For bathrooms and kitchens, a general household cleaner or a specific bathroom cleaner can be used.
- Rinse: Wipe the area again with a clean, damp cloth to remove any soap residue.
- Dry Completely: This is crucial! Use a clean, dry cloth to thoroughly dry the surface. You can also let it air dry completely. Any moisture left behind will prevent the new caulk from sticking and can lead to mold issues down the line.
A clean, dry surface is essential for a successful caulking job. It creates the perfect canvas for your fresh seal.
Troubleshooting Common Caulking Removal Issues
Sometimes, caulk just doesn’t want to come off easily. Don’t get discouraged! Here are a few common challenges and how to overcome them:
Stubborn Caulk
Problem: The caulk is old, hardened, and won’t budge.
Solution: Heat is your best friend here. Use a hairdryer on a medium setting, or a heat gun on a low setting, to warm the caulk for about 30-60 seconds. This softens the adhesive and makes it much more pliable. Work in small sections and try prying again with your putty knife or caulk tool.
Caulk on Delicate Surfaces
Problem: You’re worried about scratching paint, wood, or laminate.
Solution: Switch to gentler tools. A plastic scraper, an old credit card, or a specialized plastic caulk removal tool is ideal. Avoid utility knives and metal scrapers unless absolutely necessary, and even then, use them very carefully and at a shallow angle. Applying painter’s tape along the edges before you start can also protect these surfaces. According to Architectural Digest, proper surface preparation, including careful caulk removal, is key to a professional-looking finish.
Moldy or Mildewed Caulk
Problem: The caulk is discolored and might be harboring mold.
Solution: Safety first! Wear gloves and consider a mask. After scoring and removing the bulk of the caulk, clean the area thoroughly with a bleach-based cleaner or a dedicated mold and mildew remover. Let the cleaner sit for the recommended time to kill any mold spores. Rinse and dry completely before applying new caulk. If mold has penetrated the grout or sealant itself, sometimes removing the caulk is the only way to ensure it’s all gone.
Leaving Behind a Sticky Residue
Problem: After removing the bead, a sticky, gummy residue remains.
Solution: Try scraping with a plastic scraper first. If that doesn’t work, a product like Goo Gone, citrus-based cleaners, or even rubbing alcohol applied to a rag and rubbed briskly can break down the residue. Ensure good ventilation when using chemical removers and test in an inconspicuous area.
Benefits of a Clean Removal

Taking the time to remove old caulk properly is essential for several reasons:
- Proper Adhesion for New Caulk: New caulk needs a clean, dry surface to adhere to. Old residue, dirt, or moisture will prevent a good seal, leading to peeling and failure.
- Preventing Future Moisture Damage: By removing failed caulk, you’re eliminating pathways for water to get where it shouldn’t, protecting your walls, cabinets, and subflooring.
- Aesthetic Improvement: A fresh bead of caulk looks clean and professional, instantly upgrading the appearance of your kitchen, bathroom, or windows.
- Mold and Mildew Prevention: Removing the source of potential moisture and cleaning the area thoroughly helps stop mold and mildew from returning.
It might seem like a small detail, but a clean caulk removal is foundational for all the improvements that follow.
| Tool Type | Pros | Cons | Best For |
|---|---|---|---|
| Utility Knife | Sharp, cuts through tough caulk, readily available. | Can easily scratch surfaces if not used carefully. | Initial scoring and cutting through thick caulk. |
| Putty Knife (Flexible) | Good for prying and scraping, less likely to scratch than a knife. | May not be sharp enough for deep cuts. | Prying up scored caulk and scraping off residue. |
| Caulk Removal Tool (Plastic) | Specifically designed for caulk, multiple edges for cutting/scraping/cleaning, avoids surface damage. | Can be less effective on very hardened caulk than a sharp knife. | All-around removal, especially on delicate surfaces. |
| Scraper (Flat) | Effective for removing flat residue. | Can be aggressive if angled incorrectly. | Cleaning up thin layers of remaining caulk. |
Conclusion
Removing old caulking might not be the most glamorous DIY task, but with this guide, you know it doesn’t have to be a frustrating one. By gathering the right tools, working methodically through the steps, and taking care to protect your surfaces, you can achieve a clean, smooth finish that’s ready for a fresh application of caulk. Remember that proper surface preparation, including this crucial removal step, is the key to preventing future damage and ensuring that your new caulk provides a lasting, watertight seal.
So, next time you see that cracked or moldy caulk, don’t hesitate. Arm yourself with a few simple tools, follow these easy instructions, and enjoy the satisfaction of a job well done. You’ve got this!
Frequently Asked Questions (FAQ)
Q1: How do I know if I need to remove the old caulk?
A1: You should remove old caulk if it is cracked, peeling, discolored (from mold or mildew), pulling away from the surface, or if you notice water damage or leaks around the sealed area. A fresh seal requires a clean foundation.
Q2: Can I just caulk over the old caulk?
A2: It’s not recommended. Caulking over old caulk prevents the new caulk from adhering properly to the surface, leading to premature failure, peeling, and potential moisture problems. It also creates a thicker, uneven bead.
Q3: What’s the easiest way to remove caulk without damaging my countertops or tiles?
A3: Use a plastic caulk removal tool or a flexible putty knife. Score the edges first with a utility knife very carefully, then use the plastic tool to pry and scrape. Avoid metal tools on sensitive surfaces and always test any chemical removers in an inconspicuous spot first.
Q4: How long does it take to remove caulk?
A4: The time varies depending on the type of caulk, how old it is, and the area you’re working on. For a standard bathroom tub surround, it typically takes 30 minutes to an hour. More challenging jobs might take longer.
Q5: What is the best cleaner to use after removing caulk?
A5: For general cleaning, warm water and a mild dish soap are usually sufficient. If there’s mold or mildew, use a vinegar solution, a bleach-based cleaner (with ventilation and gloves), or a dedicated mold remover. For stubborn residue, rubbing alcohol or a citrus-based cleaner can help. Always ensure the surface is completely dry before applying new caulk.
Q6: Can I use a power tool to remove caulk?
A6: While some specialized oscillating tools with scrapers can be used with extreme caution, it’s generally not recommended for beginners or for most household tasks. Power tools can easily damage surfaces like drywall, tile, or countertops if not handled with expertise. Manual tools offer much more control.
